Tuesday, March 28, 2017

I don't adoor rust

I noticed that I had some rust bubbles on the passenger door.  I had seen these when I purchased the car, but the metal was pretty strong and didn't push through in these areas.


These rust bubbles were on the front and rear of the door.  Since the inside of the doors are another common rust area of the S30's, I opened the door to have a look.  In addition to finding unattached parts in the door (maybe contributing to some of my rattles), I found what I had feared...
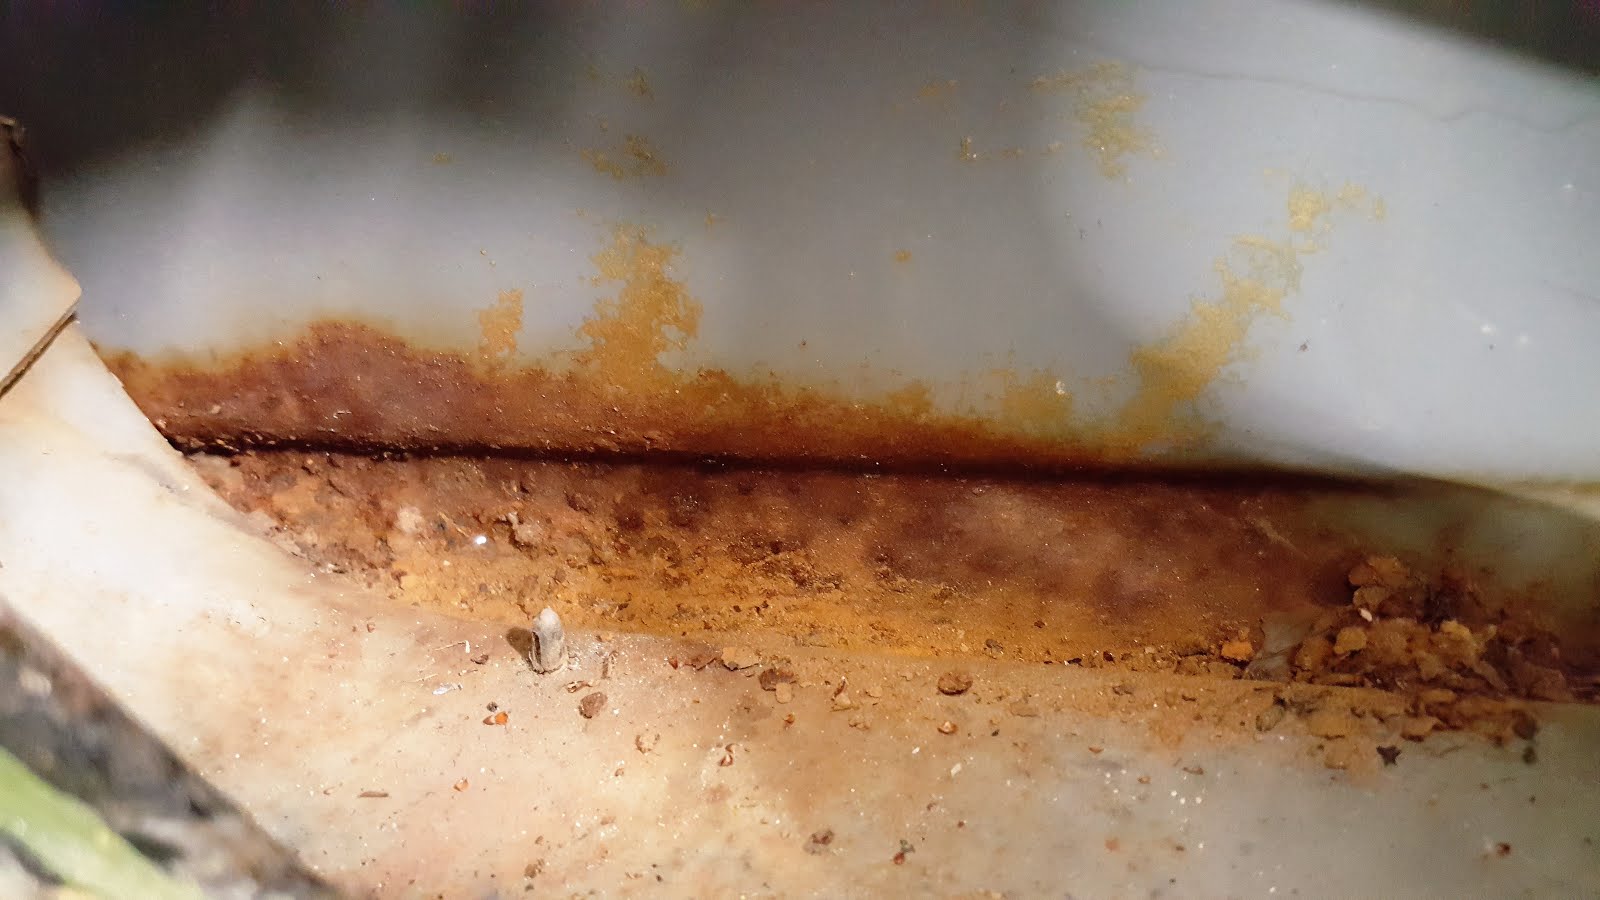

The lower portion of the door had a serious bit of rust on the inside.  In fact, after popping some of the bubbles on the outside of the door I had some small pinholes through the door where the rust was heavy.

Since the panels were still very strong (even with pressure I couldn't push through these areas), I decided to treat the panels from the inside with a product called Rust-Bullet.  This is a competitor to POR-15 and is said to bond with the rust via polymers intertwining with the rust.  I had read good reviews of the product.  Since the product needed very little prep, I used a screwdriver, vacuum, and compressed air to break-up and remove the dirt that had caused the rust to form.  I then used denatured alcohol to prep the area for the application of the Rust Bullet.  

I applied some painter's tape over the rusted-through holes in hopes that the Rust-Bullet would fill these areas enough to where I wouldn't have to patch.  I applied 4 coats of the product following the directions.  I used disposable brushes since the product is so difficult to clean and remove (this was recommended by the manufacturer).  One thing I noted is that the brushes I used to apply the product were ROCK HARD after the product had cured; this felt promising.

Now that the product has cured only time will tell if the treatment was effective.  I can say that the product went on smooth and thicker than I anticipated.  It had the consistency of motor oil and "stuck" to the rust very well.  The door looks good anyway with no real evidence that the rust was even there...


Before


After

Cowling in fear of RUST

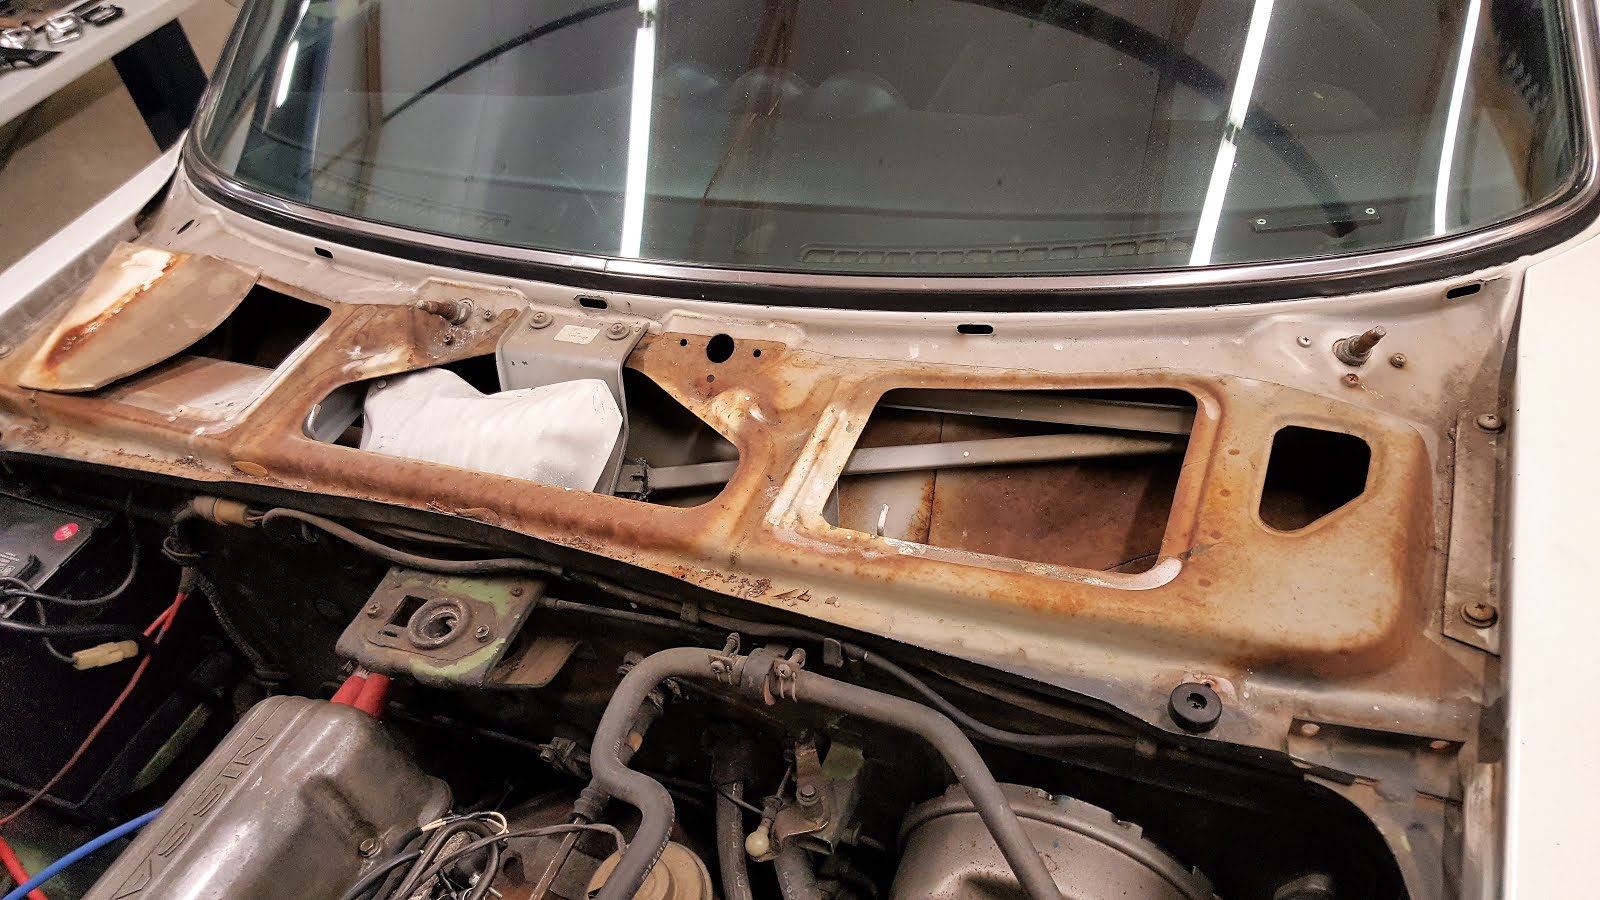
One of the common rust spots on an S30 is in the cowl area.  I had previously noticed some brown stains on the cowl finisher vents and decided to have a peak on what was underneath...


Lots of rust!  It's obvious why this area is so rust prone; just look at the piles of dirt and junk that can accumulate in the area.  This cowl finisher simply has open vents and no screening to keep out foreign matter.


Luckily I found that the rust in the cowl was only surface rust and that the metal was still sound.  Whew!  The back side of the finisher also had lots of surface rust as well.


After removing the wiper assembly, I cleaned the cowl area as best I could using a shop vac, compressed air, and denatured alcohol.  I then hosed the area down with Loctite Rust Reformer.  I also applied a similar treatment to the back of the cowl finisher.  I then primed and painted the cowl and finisher.


The finisher will be returned to the car once I reinstall the wiper motor and assembly to the cowl.

Sunday, February 26, 2017

A Mani-Cure for Aging Emblems

I have the fenders off of the 280z which gives me the opportunity to freshen-up the fender badges.  One common problem with the aging badges is the orange epoxy surrounding the letter Z; the epoxy begins to crack and oxidize badly.


The first step in restoring these badges is to "chip out" the aging epoxy.


Once the old epoxy is removed the chrome plating will be exposed underneath.  


Many people simply paint the surrounding area with a gloss red such as Rustoleum.  While I considered such a path, I really wanted a finish that closely resembled the stock look.  I was having trouble finding the right color which was a dark metallic orange.  I was browsing Amazon for metallic paints and came across a 3-part gel nail paint with a color that looked really close.  I decided to take a chance and ordered a base, color, and top coat.  For those that might like to follow this path, the paint came from Elite99, and the color code on the bottle is 9914.


I followed the instructions and applied the base coat, 3 coats of color, and a thicker top coat, using an LED UV curing lamp my wife already had (this type of gel nail polish requires the lamp for curing).  The nice thing about this paint system is that since the lamp is required for curing, I could let the coats "settle" and smooth out before curing them.  The resulting color is a very close match to the color of the epoxy chips I removed from the emblem (judging from the bottom of the chip that was not exposed to oxygen and sunlight).


Sunday, February 19, 2017

Knob Job

During my last few drives in the 280z, I noticed a rattling noise coming from the shifter.  After some highly complicated diagnosis of grabbing and releasing the shift knob, I came to the conclusion that the noise had to be coming from the knob itself.  My theory was confirmed when the knob actually came apart after a slight upward pressure.


So much for the Amco shift knob!  I began searching for a replacement knob, preferably a knob that resembled the stock shift knob.  I had difficulty locating a picture or description of a stock knob, but eventually found a brochure that featured a picture of the knob.


Apparently the shift knobs were commonly replaced with wooden knobs by dealers as an upgrade, so you would think a stock knob would be easily located... not so.  I had found cheap (really cheap) knock-offs, but nothing close to the original.  

I was about to give up and purchase a replica wooden knob when I came across an eBay seller offering a stock knob from a 1976 280z being parted out!  It was even being offered at a very reasonable price far below the wooden knob I was considering.

Upon receiving the knob, I found that the description left out a few details, such as the medallion had separated from the knob and the threaded insert was missing.  This shouldn't pose too much of a challenge though.


The medallion was easy to replace.  After cleaning out the residual adhesive left from the original installation, I used some Liquid Nails water based adhesive to secure the medallion back into place.

For the threaded insert, I used a 8mm furniture threaded insert nut (actually two stacked on top of each other) locked into place with JB Weld.


I now have an original shift knob!

Saturday, February 11, 2017

Another badge of honor

I restored another badge on the 280z: one of the pillar vent badges on the rear of the car.  I removed this badge as I needed to paint the body underneath, so why not spruce it up a bit.  I used the smallest brush I could find to paint the outer ring where the paint had completely vanished.  I used some white Rustoleum for the Z in the center and Krylon satin black everywhere else.

Applying a little polish and elbow grease

The valve cover on an engine is usually the first thing that is noticed when a hood is opened.  Nowadays, pretty plastic covers sit atop the engine hiding the beauty of the mechanics underneath.  Not so on the Z, and the valve cover was looking somewhat dingy.  Since I wanted to inspect my top end anyway, why not pull the valve cover and give it a bit of a shine.


The valve cover had developed a dingy look over the years
Looks like there's a bit of sludge I'll have to flush out

A few areas of pitting had developed on the cover, so I used some JB Weld to fill-in those areas.  I knew that it wouldn't be a perfect match in color, but then again the valve cover itself isn't exactly show quality and the color mismatch between the aluminum and the JB Weld would still be less obvious that the deep pitting.


A couple of small areas of pitting needed to be addressed

I started out by soaking the valve cover in a mixture of Pine Sol and water.  This would hopefully address some of the gunk that had accumulated on the underside of the cover.  I used a pot scrubber to aid in the removal of the oil and sludge on the underside of the cover.  


The underside of the valve cover before cleaning
A soak in Pine Sol.  Note the balloon covering the PCV fitting to keep it in.


To begin addressing the outside of the cover, I mixed-up a batch of Simple Green and water.  Since the cover of the inline 6 is so long, I had to soak each end of the cover separately in a tall bucket.  This would remove the soaked-in stains in the aluminum exterior.


I don't have a bucket tall enough for the long cover!

Once the cover had soaked for a few days on each side, I then began the tedious process of shining.  I used sandpaper, Quick-Glo, a 3" random orbit polisher, and several buffing bits on a Dremel to shine the aluminum cover to a nice luster.  The Quick-Glo was applied at the end of the process to (hopefully) seal the aluminum with the wax that the product leaves behind.


Look at that shine!

I then donned a fresh gasket and re-attached the cover using new stainless steel hardware I purchased from a seller on Ebay.  Now the cover is the center of attention when the hood is opened!


Stainless screws complete the upgraded look


Saturday, February 4, 2017

Pumped about washers

While cleaning out the washer bottle on the 280, I discovered that the washer pump was seized.  This is a common problem, but what to do?  On eBay you can find NOS pumps for a reasonable amount of money.  I found a cheaper solution: Trico makes a pump that is almost identical to the original unit.


The most difficult part of the swap was swapping the electrical connections.  The new pump had a large connector that needed to be cut off so that it would fit into the rubber cradle.  After using a Dremel to remove the connector, I used a soldering iron to transfer the connectors from the old pump to the new.


The washer is now ready to be returned to the car.

Sunday, January 15, 2017

My dash needs more fiber

Since I had my plastic welder out tonight, I decided to take a shot on a small hole in my 280Z dash by patching it with a fiberflex rod.  You can see the hole in the picture below.  S30 dashboards are well known for cracking and I have a major crack down the middle in addition to this hole.


After melting a small bit of the material in the hole, then a little more, I had a fix that doesn't look half bad...


It's not perfect, but definitely livable.  I may attack the crack soon after seeing the results here.  In fact, if the crack turns out this good, I may not pull the dash for refinishing after all!

Maintenance Day

While MLK day is tomorrow, I don't get to celebrate with my wife and son who have the day off.  I instead celebrated maintenance day which is a little known holiday and regional... very regional.

To celebrate maintenance day I hoisted the daily drivers and performed oil changes.


One thing that always perplexed me is the frailty of the rock guards under the engines on newer model cars.  They are on and off with every oil change, but over tighten one of the bolts just a bit and they fall apart.

On the G37 (which desperately needs a wash as you can see), the rock guard had several mounting holes which had split.  I decided that I would fix these on maintenance day.


My plastic welding kit continues to earn it's keep.  Using stainless mesh and a fiberflex rod, I reinforced the holes and patched the cracks.


I used a step drill bit to quickly open the hole and ready the part for re-installation.


Happy maintenance day!

Saturday, January 14, 2017

Chasing the white rabbit

I'm deviating a bit from my usual on this post.  Normally my posts explain work from beginning to end.  The amount of time it takes me to complete the work is abstracted from you, the reader (oooh, I just broke the 4th wall there, I really am off the reservation on this one).  

Now that I'm completely off course on this post, let's play follow the leader.  In my last post you've seen me go down the since I'm already there rabbit hole.  I guess I wanted to outdo myself tonight.  Here we go, try to keep up...

A few weeks ago I noticed how bad the wipers looked, so I pulled them for painting.

Since I had the wipers off and I noticed a bit of surface rust on the cowl finisher, why not pull that off and peek underneath?


Looks like I'll have to prep and paint the finisher.  I wonder what the cowl area looks like?  It is, after all, one of the common rust areas on a 280Z.


Yep, surface rust in there too.  Now, as I recalled from some research, gunk accumulates in the cowl area and clogs the cowl drains (causing moisture to build up and bad rust).


Well, I have the gunk but the rust is still just on the surface.  Whew, I dodged a bullet there.  Hmm, from that same research though, I remember that the cowl drain simply dumps into the fender area.  I already had a few rust bubbles on the door, but lets look a bit closer at the fender...


See that brown line where the fender meets the rocker?  Ruh roh.  How can I tell if that's a problem?  Well, I read that pulling the fender isn't actually that hard...


...and as far as you know it wasn't!  Blog magic makes everything easy.  Check out how much decaying organic matter was inside the fender on top next to the engine.  


Well, what about that fender?  See the pile of dirt and crud behind the wheel in the wide shot above?  That was all in the fender, right where that rust line had started.  Aside from the dead leaves, dirt, and compost that was in the fender, I also found a potato farm amidst a small self-sustaining ecosystem.  As for the fender...


You can see the impact that the nature preserve had on the fender.  Luckily this was caught in time.  There will be no need for weld-in patches here.  I will also be able to pound out a dent in the fender now and repaint the lower front valence.  Why?  Because I'm already there anyway!

After seeing this, I will most definitely be pulling the other fender as well.