Tuesday, June 26, 2018

The Sky is Falling!

Ok, maybe the sky isn't falling, but is sure felt that way when driving my pickup (1996 Nissan D21 Hardbody 4x2 standard cab).  The headliner had finally given up after some years of sitting in the hot sun.  I had done much research on headliner replacement and decided to give it a go.

The fabric came from JoAnne's; they have quite a selection of headliner fabric.  I chose 3M Super Yellow Trim adhesive after reading many articles on the different adhesives that could be used.

The headliner itself was a breeze to remove.  Remove the sun visors and retainers, the dome light, door trim and three plastic rivets and it's out.  The next part was time consuming but not difficult: removing the degrading headliner and foam from the backer board.


After peeling off as much as I could by hand, the trick to getting the rest of the foam and gunk off the backer board was to use a plastic putty knife followed by a wire brush to scrape away then brush off the old foam.


Once done I had a nice and clean substrate on which to glue the new fabric.  I started by sizing up the fabric and folding it over on itself.  This would allow me to work on half of the headliner at a time.  I used plastic to protect the "show side" from adhesive overspray.


Following the adhesive directions, I sprayed both the backer board and the fabric back with two passes of the adhesive.  After setting for 5 minutes, I carefully started from the middle and worked my hand from the center towards the side, pressing the fabric down as I go. I worked slowly and made sure that the fabric did not touch the contours of the backer until I was ready for it to do so.  There were no surprises here and once the first half of the job was done I repeated on the second half.


I let the adhesive dry overnight before using a razor to trim the sides and cut out the mounting holes.  As the last step, I flipped the headliner and glued the edges of the fabric onto the backside of the backer to ensure that anywhere the edges might be exposed had a finished look.


After about an hour, I reinstalled the headliner back into the truck.  I am very happy with the way this job turned out.  To me, this looks just as good as the factory installed headliner.  Only time will tell if the adhesive holds-up in the Tennessee summers...


Monday, May 28, 2018

...and the polishing continues

It seems like every time I go into the garage, I polish something on the Pulsar NX in my quest to make the oxidized black paint shine.  The pillars and roof received some love over the weekend; you can definitely tell a difference in the 50/50 shot below!

Sunday, May 27, 2018

Getting Racked

Not too long ago I replaced the rack and pinion on the Pulsar with a rebuilt unit from BBB Industries.  After going through the purge process I noticed a small drop of fluid under the left side bellow.  I didn't think much of it and thought that it may have been some residual oil from the installation process.  Amy drove the car around the neighborhood a few times as work completed on the car.  It was at this point that I noticed a puddle of fluid on the garage floor.  Upon inspection, the fluid was coming from the vent connection on the top of the left bellow.  To confirm my suspicion, I cut the plastic tie from the bellow and opened up the end; fluid came pouring out of the bellow...


Apparently the seal on the left side was faulty.  I've read that this sort of thing is not uncommon with rebuilt racks.  I recall that years ago when I was a teenager we had to take my car back to the mechanic a few times as he battled bad rebuilt racks.  This rack was warranted for three years so I guess I'll be testing that warranty.  Given the amount of labor involved in removal and installation, I had hoped not to do this again, but I guess that wasn't in the cards.  At least now I know the fastest way to go through the procedure.  More updates (hopefully) to come.

Saturday, May 26, 2018

Woe to the Blow(er)

You may have seen my battle with the blower motor in the 280z.  Last summer the motor began making a screeching noise on the high setting.  I rebuilt the motor thinking that it just needed to be cleaned up and lubed.  This spring the screeching noise occurred on the medium speed as well.  I had read a couple of articles concerning modern replacements for the blower motor and squirrel cage.  There were two units that seemed to be the most applicable: a blower motor for a 1988 Honda Civic and a unit for a 1991 Kia Sportage.

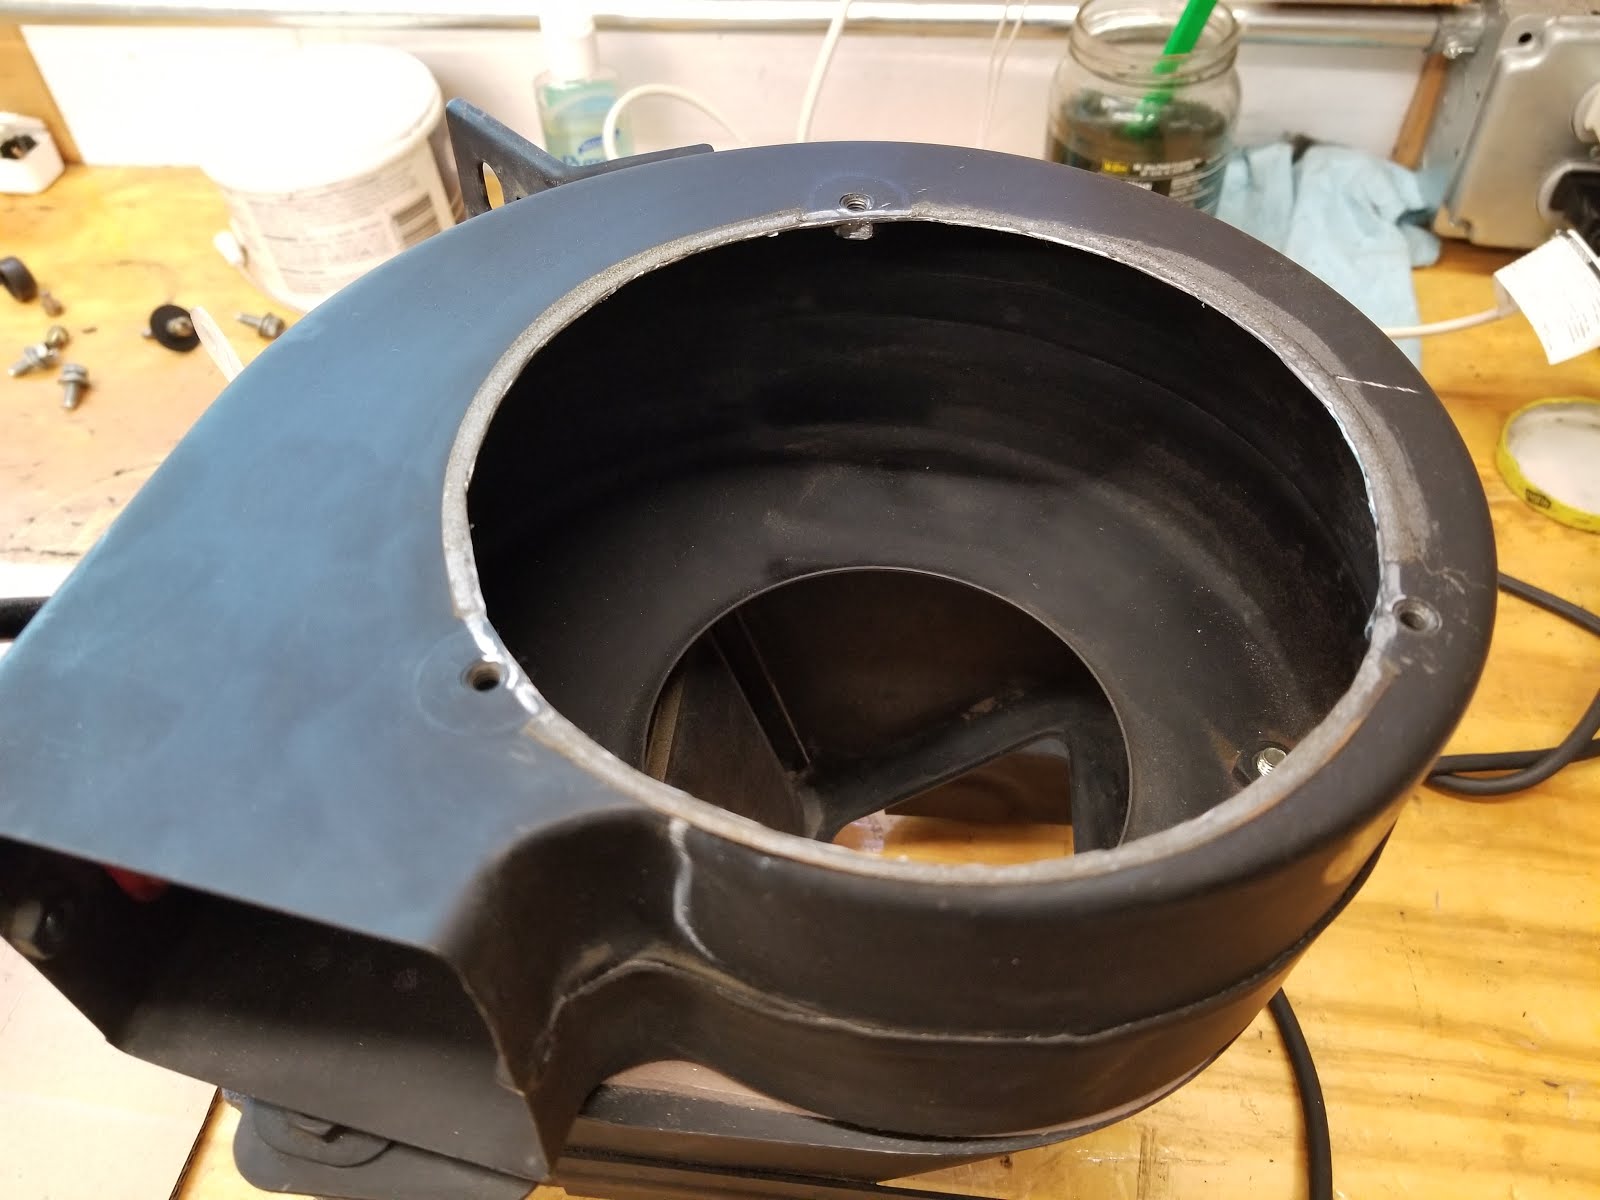
I've had some practice removing the motor assembly.  Previously I would remove the blower motor first, then the blower housing.  I've realized that it's much easier just to remove the entire housing with the motor still attached.  3 bolts and the entire unit just drops out.


After reading some articles I decided it was a tossup so I purchased a blower assembly for the Honda Civic (DEPO model 317-58012-000).  Upon receiving the unit, I immediately noticed that the vanes on the squirrel cage fan were pointed in the wrong direction.  The motor itself lined up nicely.  


The fan assembly would not fit into the opening in the housing, so I marked the housing using the fan as a template.


I used a Dremel with a cutting wheel attachment to enlarge the opening for the blower fan.  It was at this point where things fell apart (literally) with the Civic blower.  I installed the blower into the housing for a bench test.  Moments after I started the fan, I heard a noise.  I found that the squirrel cage had several cracks and had actually come apart!  Since the squirrel cage from the original blower was not going to fit without heavy modification, I decided to return this fan and try the Kia Sportage unit, which turned out to be the better route.


The fan for the Kia unit was the same size as the Civic, so my enlarged hole did not need to be modified.  The Kia motor did have a ventilation duct on it, presumably to keep the motor cool with fresh air.  After test fitting the new assembly, I traced the outline of the duct where it would meet the housing a drilled a hole; maybe this would draw a small fit of air through the duct.


Bench testing proved that everything was working correctly.  The Kia unit was a perfect fit in every way after enlarging the opening in the housing.  While it would have been acceptable to mount the unit without any kind of a seal between the motor and the housing (the original motor wasn't perfectly sealed by any means), I decided to squeeze a length of vinyl tubing (aquarium tubing) into the edge surrounding the motor; this would provide a gap seal between the motor and housing.  Unfortunately I forgot to snap a pic of that step.


To wire the unit, I clipped the original harness from the motor.  I figured if I ever needed to go back to the original motor I could simply install some male spade connectors on the remaining pigtail and use the new harness I am constructing.  I used some lengths of 12 gauge wire to extend the original harness.  Due to the current that flows through this assembly, I would highly recommend soldering all connections.  I do this anyway by default as I learned long ago that crimp only connections have a higher failure rate.  I also use heat-shrink tubing instead of electrical tape where possible.


Note that the white wire from the harness is the positive side of the connection and should be connected to the spade connector in the vertical orientation (or lower position).  The markings on the connector indicate spin direction.


The new motor and fan have plenty of clearance inside.  Note in the below pictures I have the duct installed upside-down.  I do that every time...


You can see in the below pic the ventilation duct over the hole I drilled into the housing.  Whether or not it is effective I may never know.


All connections made and the assembly is mounted back into the car.  I flipped through all three fan speed settings (the non-factory A/C cars only had three fan speed settings) without hearing any abnormal noises.  The true test will be the next hot summer drive...


In the end, I am very happy that the Civic motor didn't work out as the combination of the motor and cage was perfect from the Kia.  I would encourage anyone considering this swap to go with the Kia motor from the start.  The unit I purchased on Amazon is a TYC 700120.

Sunday, May 13, 2018

She's Alive!

A small mother's day treat for Amy: she drove her Pulsar NX for the first time since purchase!  While there are still some tasks that need to be complete before I'll turn it loose for general driving, she did take a few laps around the neighborhood this weekend.  The expression on her face says it all.

Dashpot Cleanup

One thing I continue to chase on my 280z is the difference between cold and warm idle; when cold the idle was about 300-400 RPM lower than warm.  As part of this investigation, I had disassembled the front throttle linkage and removed the dashpot.  For those that are unfamiliar, the dashpot is a mechanism added to manual transmission models and "softened" the throttle's return to full idle.  Once the throttle was released, it would hit the dashpot pin (a repurposed vacuum actuator) and slowly allow the throttle to return to resting idle position.  

To ensure this part was working as expected, I sprayed silicone lubricant into the open end and pumped the actuator several times, letting the silicone work it's way around the inside.  After several cycles of fill and drain, I left the actuator upside down overnight to drain.

As a last bit of beautification, I painted the actuator using a Rustoleum enamel that is close to the color of the yellow-zinc plating that adorned many of the metal parts in the engine bay.

Before Cleanup
 
After treatment

Sunday, May 6, 2018

Dueling Door Openers

This weekend I finally had a chance to install a second garage door opener that Amy bought me for my birthday a few months ago!  

Sunday, April 15, 2018

Garage Babes

Here are some pics of my girls helping out in the garage...


New CV for Me

One of the issues I noticed after getting our Pulsar on the lift for the first time was that the passenger side CV axle needed to be replaced.  The boots were split wide open and there was CV grease coating much of the underbody.


Since I had no idea how long the axle had been open to the elements I decided to replace the axle.  I could not find a remanufactured unit, but I did happen to find a brand-new unit on Autozone.com for the same price as a remanufactured!  The new axle arrived just a few days after ordering.

Replacing the axle was surprisingly easier than I had anticipated.  After separating the steering knuckle from the strut and removing the axle nut with an impact wrench, I was able to work the spline shaft out of the hub assembly.  


I drained the transmission fluid first, then it was simply a matter of removing the carrier bearing bolts (see in the top photo above) and pulling the axle out from the transmission.  


I cleaned and greased the output shaft seal.  I had a new seal, but due to the room with which I had to work I decided it would be safer to leave the existing seal in place since there were no signs of leakage.  It's easy enough to pull the axle if the seal begins to leak.  Installation was as simple as reverse of assembly, although I did borrow some extra hands to ensure I could focus on re-inserting the axle into the transmission without damaging the seal.

In order to tighten the axle nut, I reinstalled the wheel and lowered the car; this allowed me to apply the 150 ft-lbs of torque without worrying about the car moving or falling off the jack stands.  I was able to do this due to the opening in the center of the aftermarket wheels on the car.  I have yet to test drive the car since this work has been completed, although I don't currently anticipate any issues.

Fade into Black

The wheels that are on the Pulsar (not factory) are a nice bronze color, but they don't match the rest of the car.  Amy asked if the color could be changed, and my first thought is that they might look good in black.  Since paint is such a commitment and we're not really certain that black is the way to go, why not experiment with Plasti Dip?

After removing the wheels and cleaning them thoroughly, I stuck a series of old business cards between the tire and the rim; this would eliminate any work of peeling the coating off the tires.


I then applied 5 or 6 very light coats of black Plasti Dip, allowing about 30 minutes between coats.


The wheels turned out great!  I've only treated one pair of wheels since I know I have to get new tires and the coating will likely need touching up after the tire mounting process.  This did give us an idea of how the car will look with the new color on the wheels.


I don't yet know how well the Plasti Dip coating will hold up to the rigors of the road, but I've read that the original (as compared to Rustoleum or other brands) holds up much better.  Time will tell!