Friday, March 31, 2017

The rust battle rages on

Another common spot to check for rust on an s30 is underneath the battery tray.  Apparently the battery tray hose can break and leak acid on the body underneath.  Additionally, the shape of the area underneath the battery makes it prone to harbor dirt and debris which in turn will hold moisture and cause rust.  The latter is the case with my 280z...


Aside from the rust under the tray, the engine bay is a mixture of the original factory green and a flat black which was seemingly sprayed over the factory color with little to no prep.  The black has been flaking off in chunks.  


Inspired by the newly painted radiator brace, I decided to address both the rusty tray area and the multi-color  engine bay (or at least one side of it).  Donning a cordless drill and a set of wire wheels and brushes, I roughed the surfaces in preparation for primer and paint.  I then carefully masked the engine and other bits not being removed.  I didn't get any shots until the primer and color coat were applied, but I can say that it looks a lot different with a single color adorning the side of the engine bay.


Only time will tell if the surface rust underneath the battery makes another appearance.

Blues Bracket

Today I pulled the vacuum canister and bracket.  Firstly I wanted to see if it was possible to change the carbon in the canister (it isn't).  


Secondly I wanted to paint the bracket to match the newly painted air cleaner.  At least one of the two was successful!

Thursday, March 30, 2017

Braced for cleanup

My 280z started life as a metallic green color, but somewhere along the way it was repainted white.  While the outside of the car received this new white coating, the engine compartment was simply sprayed with flat black and with little prep or sanding.  In fact, many of the components within the engine compartment received a black coating.  Like much of the engine compartment, the black overcoat on the radiator cross brace was flaking and showing the original color underneath.  


After peeling off the factory stickers on the cross brace and using brake cleaner to remove the residue, I used a wire brush on a drill to remove loose paint and rust.


I then shot the brace with 2 coats of primer.


Once the primer had cured I sprayed three coats of semi-gloss black.  I will eventually apply the same to all areas of the engine compartment a section at a time.


PCV TLC

In a continuing effort to eradicate potential vacuum leaks, I replaced the PCV valve on the 280z tonight.  The valve itself was sticky, but not completely blocked.  Since a new valve was about $5, why not replace?


Luckily, the PCV breather tube was in good shape; those are much harder to come by.  Granted, I'm sure I could adapt a hose from another vehicle if need be, but I'll save that task for another day.  It is noteworthy that the hose currently on the vehicle was flared at one end with an insert to reduce the I.D. of the end at the valve; I had heard that Nissan had changed the design of the hose in later years but I have no idea what this flare would accomplish.  I added hose clamps to both ends of the hose since there were none before and there was evidence of leakage at the valve end.


I accidentally flipped the camera when taking the above shots... just look at that concentration!


Tuesday, March 28, 2017

Refreshened air

The air cleaner on a 280z stands out when the hood is opened.  Unfortunately, mine was looking a little worse for wear.  I decided to freshen it up a bit.


The color on the air cleaner was a proprietary color that was used by the supplier of the part.  The carbon canister bracket also uses this color.  Unfortunately the color is not easy to come by.  There are some people selling specially mixed cans of paint for Datsuns, but at $30 per can I thought I could find a more practical solution.  After some research, I found that the Pontiac Blue engine enamel from Dupli-Color was a close match.

I began by stripping the paint and rust.  While I had never used wire wheels before, I've found them invaluable in my recent work.  Not only do they strip paint and rust very quickly, they can also remove skin just as fast!


After about an hour of working with the wire brushes on a drill, I had the upper and lower housings stripped and ready for painting.


According to the instructions on the can I had an hour from the first spray to apply three coats of primer and three coats of color.  This gave ten minutes per coat and I had to spray both top and bottom.  I ended spraying in five minute intervals, alternating sides of each part to give ten minutes between coats.  


While the end color was not a perfect match to the original color, I actually like the new color as it is a little deeper.  I'll reinstall the unit once I complete some other work in that area of the car.


Making new connections

The boots on several of the electrical connectors on various engine sensors had degraded over the years on the 280z.  While there are replacement kits for these connectors, I thought I'd make a quick fix to seal them up instead of going to the trouble of splicing new connectors.

To address the issue, I used heat-shrink tubing over the connector and boot, then finished up the seal with electrical tape.

I don't adoor rust

I noticed that I had some rust bubbles on the passenger door.  I had seen these when I purchased the car, but the metal was pretty strong and didn't push through in these areas.


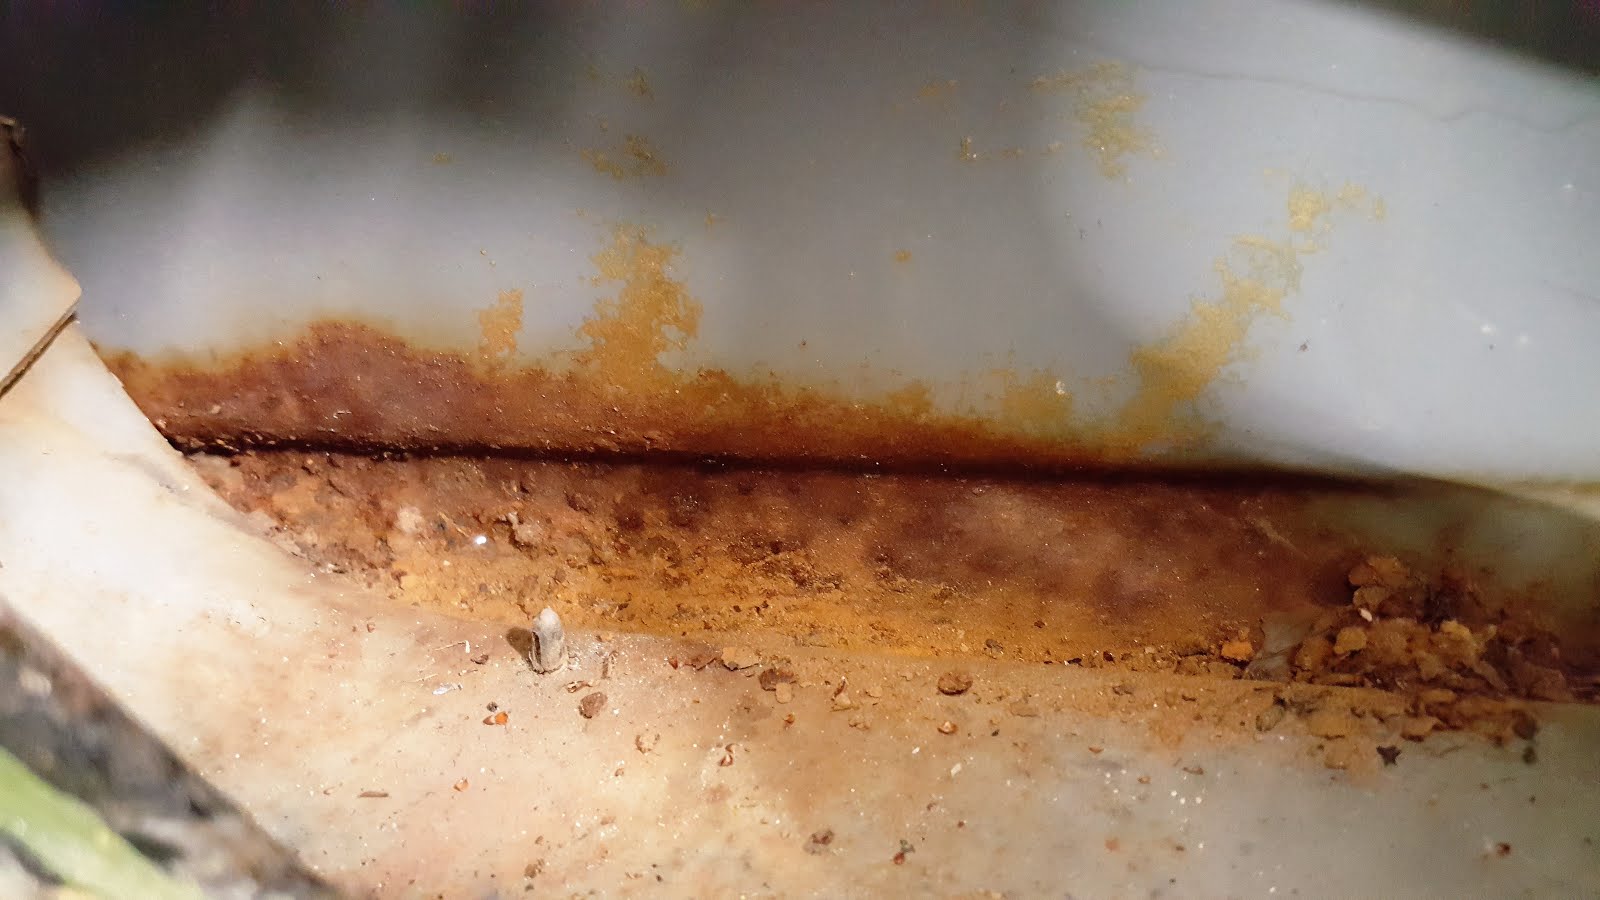
These rust bubbles were on the front and rear of the door.  Since the inside of the doors are another common rust area of the S30's, I opened the door to have a look.  In addition to finding unattached parts in the door (maybe contributing to some of my rattles), I found what I had feared...


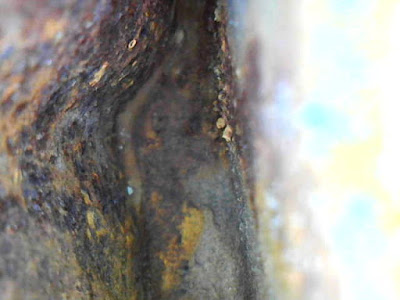
The lower portion of the door had a serious bit of rust on the inside.  In fact, after popping some of the bubbles on the outside of the door I had some small pinholes through the door where the rust was heavy.

Since the panels were still very strong (even with pressure I couldn't push through these areas), I decided to treat the panels from the inside with a product called Rust-Bullet.  This is a competitor to POR-15 and is said to bond with the rust via polymers intertwining with the rust.  I had read good reviews of the product.  Since the product needed very little prep, I used a screwdriver, vacuum, and compressed air to break-up and remove the dirt that had caused the rust to form.  I then used denatured alcohol to prep the area for the application of the Rust Bullet.  

I applied some painter's tape over the rusted-through holes in hopes that the Rust-Bullet would fill these areas enough to where I wouldn't have to patch.  I applied 4 coats of the product following the directions.  I used disposable brushes since the product is so difficult to clean and remove (this was recommended by the manufacturer).  One thing I noted is that the brushes I used to apply the product were ROCK HARD after the product had cured; this felt promising.

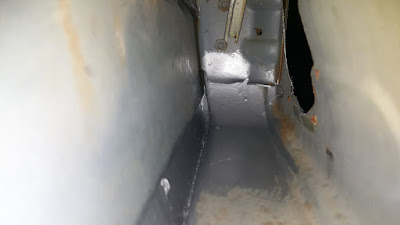
Now that the product has cured only time will tell if the treatment was effective.  I can say that the product went on smooth and thicker than I anticipated.  It had the consistency of motor oil and "stuck" to the rust very well.  The door looks good anyway with no real evidence that the rust was even there...


Before


After

Cowling in fear of RUST

One of the common rust spots on an S30 is in the cowl area.  I had previously noticed some brown stains on the cowl finisher vents and decided to have a peak on what was underneath...


Lots of rust!  It's obvious why this area is so rust prone; just look at the piles of dirt and junk that can accumulate in the area.  This cowl finisher simply has open vents and no screening to keep out foreign matter.


Luckily I found that the rust in the cowl was only surface rust and that the metal was still sound.  Whew!  The back side of the finisher also had lots of surface rust as well.


After removing the wiper assembly, I cleaned the cowl area as best I could using a shop vac, compressed air, and denatured alcohol.  I then hosed the area down with Loctite Rust Reformer.  I also applied a similar treatment to the back of the cowl finisher.  I then primed and painted the cowl and finisher.


The finisher will be returned to the car once I reinstall the wiper motor and assembly to the cowl.