Saturday, June 15, 2019

Wheely Shiny Wheels

Amy was pretty insistent about wanting the wheels on the Pulsar NX painted silver.  I had already experimented with Plasti Dip and had coated two of the wheels in black.  I did not proceed with coating the other two wheels since I knew that I had to have new tires mounted; an operation which would destroy the Plasti Dip finish around the rims.  In researching possibilities to paint the wheels silver, I read reviews on Plasti Dip Bright Aluminum Metalizer.  Many people were using this to color their wheels with great success.  A quick search on Amazon made me realize that this was a very popular color and the price per can was in the $25 range.  I decided that this was the route I wanted to take and I was able to locate three cans of the Bright Aluminum color at Pep Boys for $8 per can!

The Plasti Dip Metalizer coatings require a base coat of another basic color.  Black Plasti Dip is cheap enough and works perfectly as a Metalizer base coat.  After thoroughly cleaning the wheels, I began by masking the tires then applying three coats of black Plasti Dip to the front and back.


After the black basecoats three coats of the Metalizer were applied.


I must say that the coating exceeded my expectations.  The wheels look as if they were made of cast aluminum.  Amy was quite thrilled to see them on the Pulsar!

First Drive

After finishing up a front-end alignment it was time to insure the Pulsar NX as it was getting close to being road-worthy.  Why not celebrate by letting Amy take her first drive outside of the neighborhood!  She chose to drive about 5 miles to Sonic for a Diet Coke and had a smile on her face the entire time.


Pulsar Polishing

The paint on the Pulsar NX was in really bad shape.  Based on it's condition, sap etchings, and pine needles in every nook and cranny, I'm guessing it had spent many years parked under trees.  When we first purchased the car I gave a quick test on the deck lid to see just how bad the finish was.


After much color sanding, polishing, sanding through to the primer, painting, sanding through again, polishing, and waxing, the finish is finally at an acceptable level.  While not perfect, the Chemical Guys Black Light glaze really gave the paint a deep shine.

Back in Black

Some of the trim on the Pulsar NX had faded over time.  Additionally, some of it had old wax stains that I was unable to remove using a vinyl eraser (of you've never read about using a vinyl eraser to remove wax from trim, Google it; you'll be amazed).  You can see these marks in the photo below, just above the turn signal.


After some research, I found a product that seemed to be highly recommended for restoring black trim: Forever Black.  This is not a dressing but rather a treatment that will dye the plastic black again.


The result was quite impressive!  After two coats the white marks disappeared and the trim was a nice and consistent black color!

Thursday, June 13, 2019

Rack Rebuilding

Previously I had written about my woes with the rack and pinion on the Pulsar NX.  Since the rebuilt steering rack was leaking, I decided to address the leaks in the original rack myself.


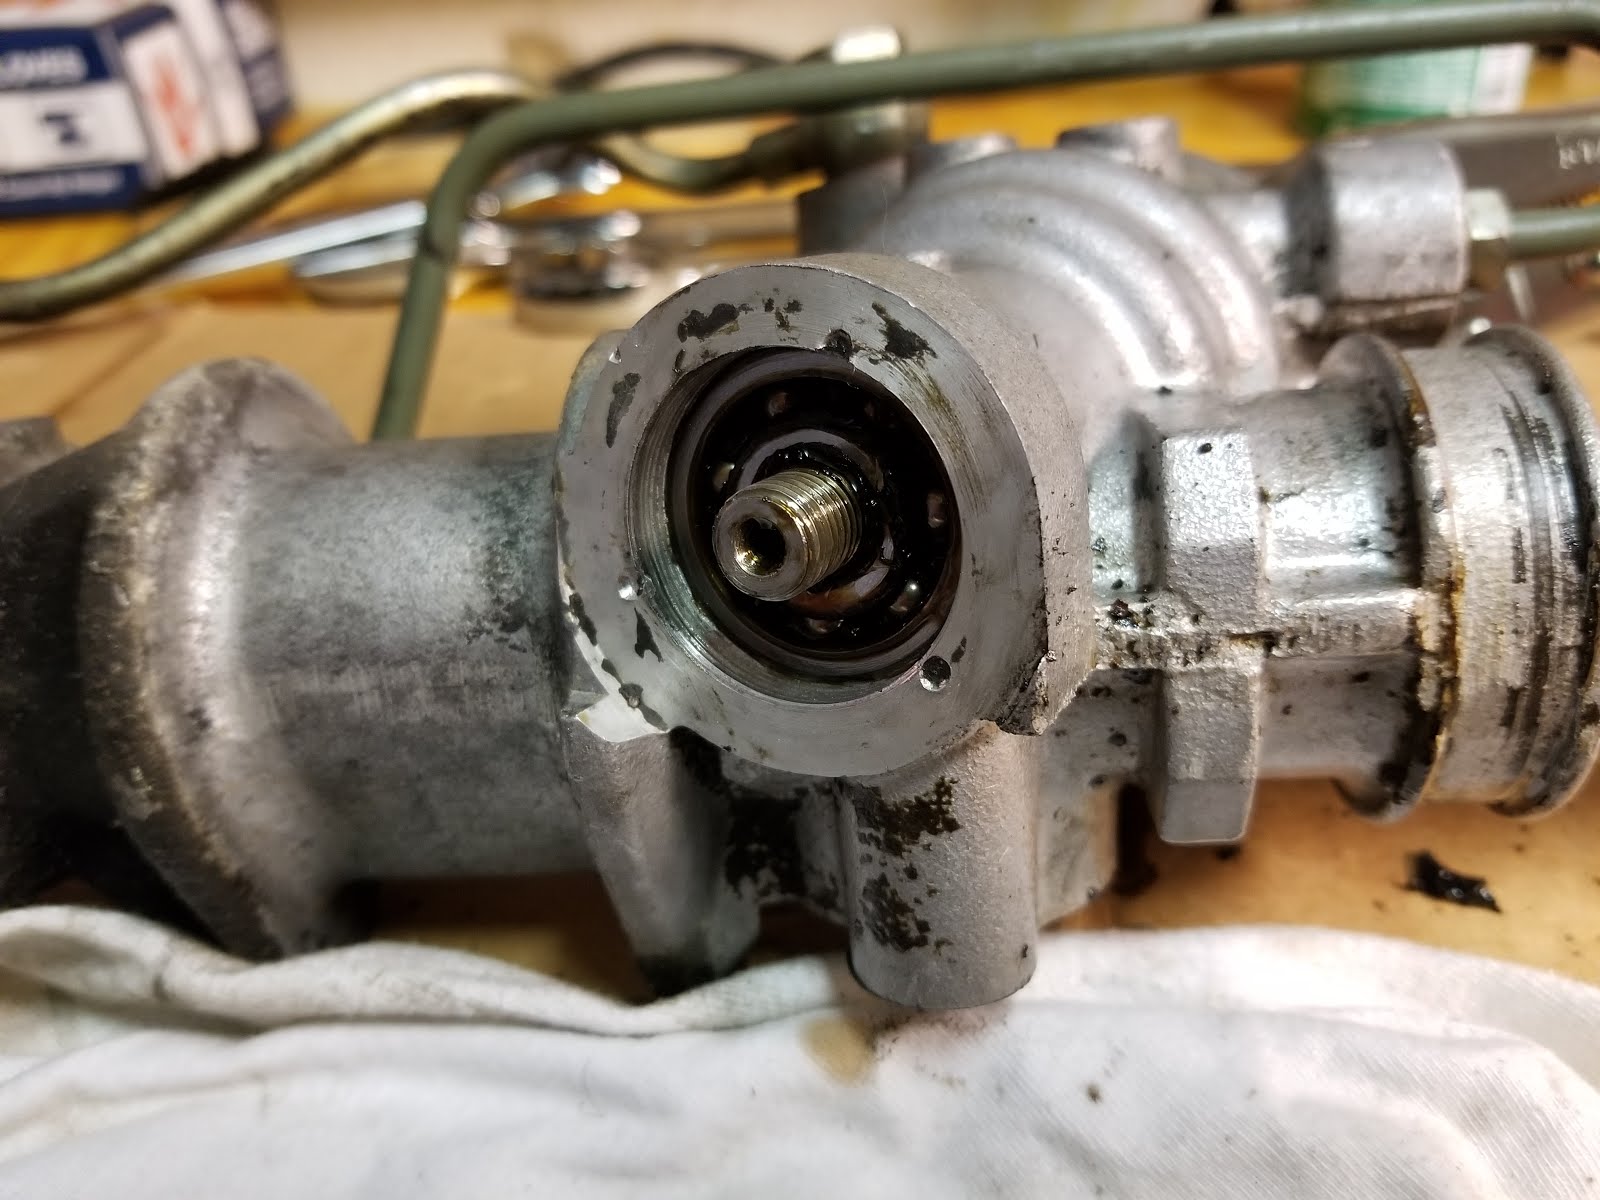
The leak was coming from the input shaft at the pinion gear.  Luckily, the seals in this area were the easiest to access.  


After removing the top retaining clip I was able to remove the top cap and replace the top seal.


The rack tensioner was then removed along with the bottom cap and pinion retaining nut.


At this point the pinion was removed by pulling it out from the top.


To replace the lower seal, the lower pinion bearing must also be removed.  I used a blind puller to remove the bearing and subsequently the lower seal.


I then installed a new lower pinion seal and replaced the bearing using an appropriately sized socket to tap them both into place.  The pinion was then slid back into the rack housing and the tensioner was reinstalled.


The top cap and seal was put back into place and the retaining clip reinstalled.  A fresh set of bellows was installed and the rack was reinstalled into the car.


A vacuum bleeder was used to both purge the air from the system and test for leaks.  The reservoir was topped off and the system was tested.  After several test drives no leaks were found.  I now have to decide what to do with the rebuilt rack, but the ultimate goal of repairing the steering system on the car has been achieved.  


Rebadging

When we purchased the Pulsar NX, the badges on the rear hatch looked odd.  After some research, I found that the badges were reversed from right to left.  This told me that the rear hatch had been repainted.


I found a set of replacements on eBay to correct the positioning of the badges as well as replace the old and faded badges that came on the car.