Showing posts with label Pulsar NX. Show all posts

Sunday, October 29, 2023

Pulsar Parcel Bar

The Pulsar NX came with a parcel bar across the back seats whose purpose was to keep items stowed in the back from flying into the front of the car when stopping.  This bar was missing from our Pulsar.  In fact, I had a hard time finding an image of tis parcel back large enough for me determine if I could recreate it.  I finally found a listing for another 1988 Pulsar that still had the parcel bar intact.  


Using this photo I created a couple of designs.  The first was a bit off.


But the second design looked close enough to move forward.  The design leverages a chrome shower curtain rod as the bar across the mounts.


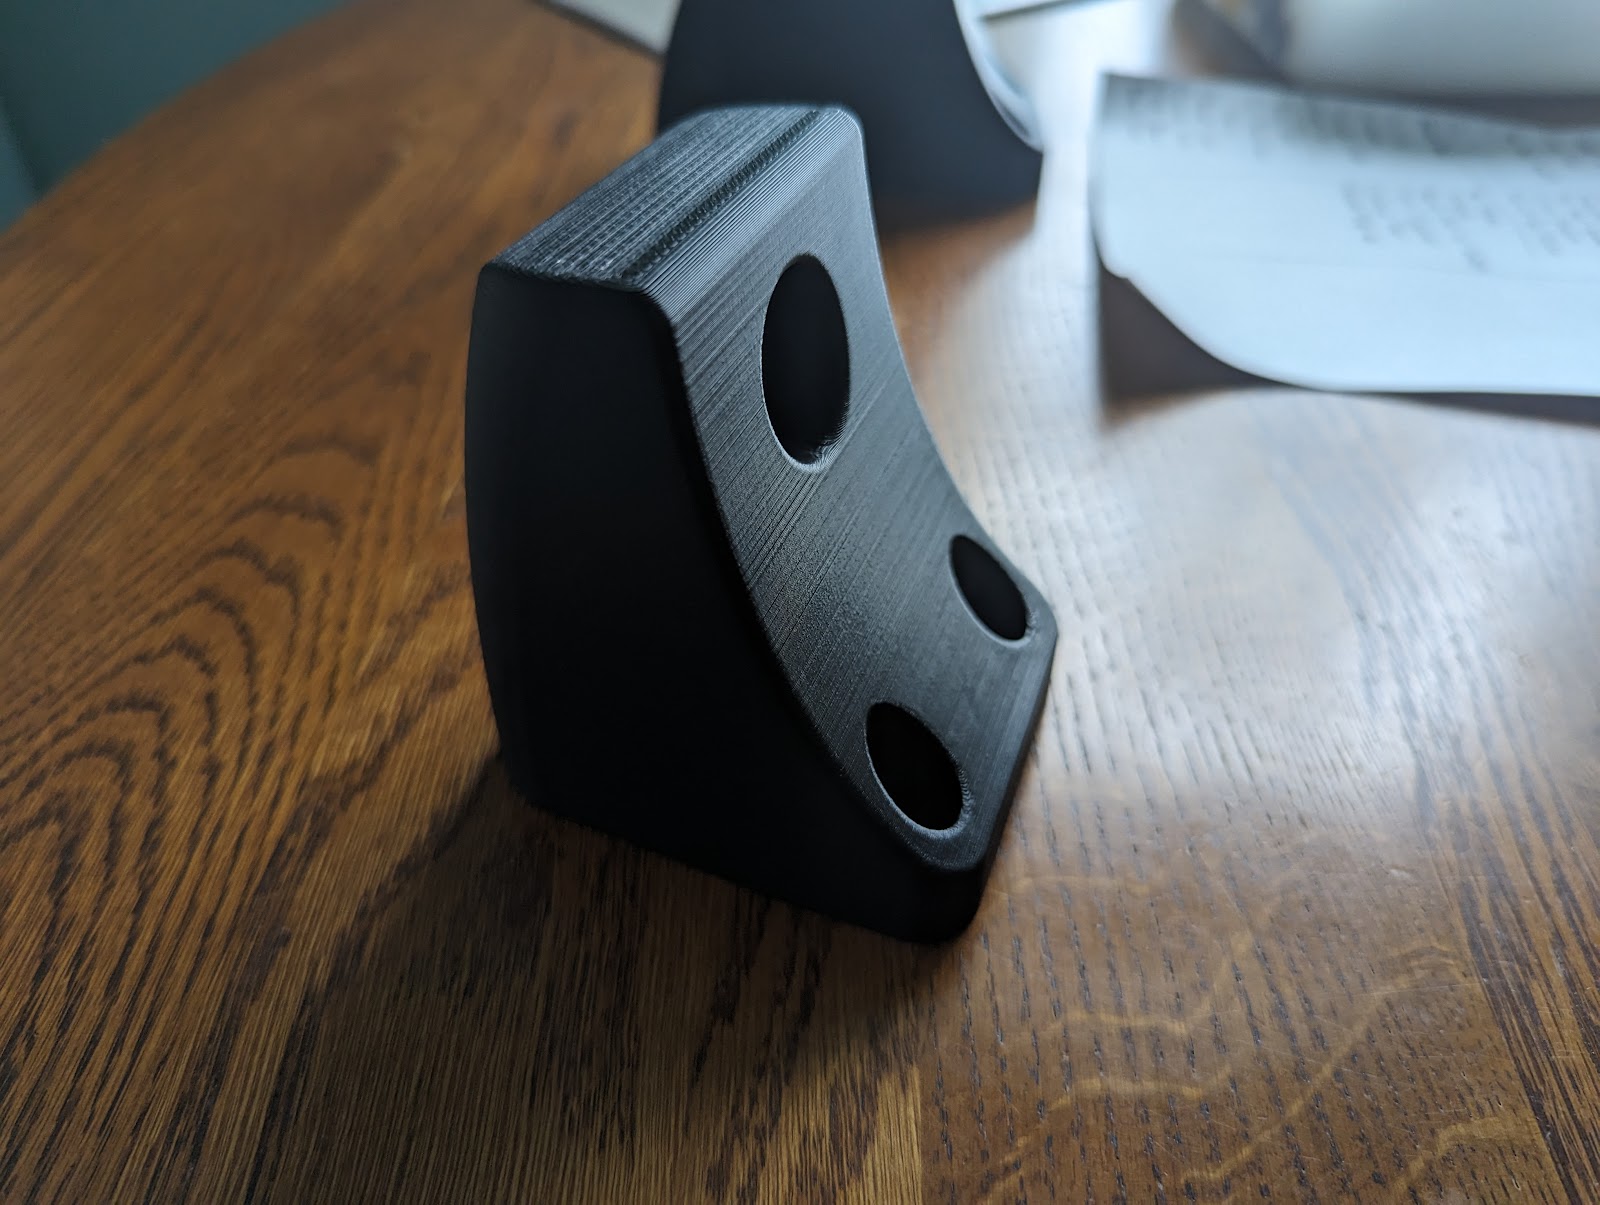
I used stainless steel cap bolts to attach the mounts to the seat backs.


I'm quite happy with the way this turned out and unless you're close enough to see the layer lines in the mounts you'd never know this wasn't the factory parcel bar.

Saturday, October 28, 2023

Pulsar Door Vent Seals

 The door vent seals on the Pulsar had become brittle and started disintegrating over 30 years.  


With replacement seals unavailable, I decided design and print replacements.  The seals themselves weren't too complex in shape.  Instead of trying to fit the metal clips on the factory seals I simply used Ultra Black to attach the seals to the car.  This worked perfectly and now the door vents blow strong again!


Sunday, October 15, 2023

Pulsar Fuel Pump Change

I've been chasing an issue with the Pulsar where it is hard to start after sitting for some time.  Since the car has unknown mileage I thought it wouldn't be a bad idea to try replacing the fuel pump.  The thinking here is either the pump itself is not pressurizing fast or the check valve has gone bad.  This would also give me an opportunity to inspect the fuel tank for dirt or corrosion.

Dropping the tank wasn't particularly difficult, just tedious.  After disconnecting the electrical connections and hoses under the seat, removing the filler hose, removing some shielding and finally the tank bolts I was able to work the tank out from under the car.


While the outside of the tank looked 30 years old, I was very happy to find the inside of the tank extremely clean.  I found no need to clean the inside of the tank.


The fuel pump itself (ordered from Summit Racing) was an easy swap as it was identical in size and shape.


Using a new seal and stainless bolts, I returned the fuel pump to the tank.  Reinstallation was simply a reversal of the removal steps.


While the new pump ultimately did not solve my starting issues, I do feel better knowing the likelihood of being stranded by a pump failure has been reduced. 

Saturday, February 4, 2023

Sloppy Pulsar Wipers

The wipers on the Pulsar always had a lot of "slop" to them; they seemed to pause momentarily at each end of their stroke.  I opened up the cowl to find that the bushing between the wiper motor and linkage to be missing!  I searched online but could not find a suitable replacement, so I decided that I could create one myself using my 3D Printer.

After a few measurements I had a design that I felt would work.  I printed the part using carbon-fiber infused nylon to give it some strength.  The black part in the photos below is the newly created part.


Before installing I used some 3M silicone grease to lube the parts.  The new bushing snapped into place perfectly.  


No more wiper slop!

Monday, January 16, 2023

Pulsar Odometer Repair

The odometer never worked on the Pulsar when we bought it and it was registered with unknown mileage.  The speedometer and trip meter functioned, so I knew I had a chance of fixing the problem.

Removing the gauge cluster on a Pulsar NX is not terribly difficult.  Remove the steering column cover, the cluster bezel and the switch pods will give you access to the cluster.


The cluster then simply pulls out after removing the four screws that hold it into place.

Removing the speedometer also was not difficult after unsnapping the Lexan cover and unscrewing the corresponding screws in the back of the cluster.  Once I had the speedometer pulled I could see the issue: the first odometer gear had a broken tooth and would not engage the drive.  To fix this I removed the odometer gears by gently opening the metal brackets at each end, you can do this with a small screwdriver and pry the two prongs apart.  I then removed the broken gear and "sacrificed" the six digit of the odometer by shifting all remaining gears towards the drive gear.


Since we had no idea how many miles were on the car I simply reset the odometer to a nice round number: 100,000.


Before reinstalling I used a power drill to spin up the speedometer for a bit and ensure the odometer worked as expected.  Another part of the car working again!


Saturday, January 14, 2023

Pulsar Air Idle Control Valve Connector Change

The connector on the Air Idle Control Valve was barely hanging on, so I ordered a replacement from Z1 Motorsports and replaced it.  As usual, connections were soldered and heat shrink was used to make the connections durable and look good.  


Before


After


Monday, January 2, 2023

Pulsar Ignition Switch Bezel

The ignition switch bezel was missing on the Pulsar when we bought it, so I designed and printed a replacement.   


Saturday, July 6, 2019

Harnessing the Power

Recently when examining one of the spark plugs on the Pulsar NX, I found that the ignition wiring harness was in poor shape with every coil connector broken and held in place by friction only.  I found replacement connectors on eBay for $2 each.  


To get the harness out of the car, the intake must be removed as well as the cover over the ignition coils.


The harness can then be removed by removing the coil connectors as well as two connectors near the airbox and a ground wire.  You can see in this pic how degraded the coil connectors had become.  Once removed I stripped the sheathing from the harness so that I could access each wire.


Working one connector at a time and one wire at a time, I cut the old connector off and soldered in the replacement.  Heat-shrink tubing was used over each splice and electrical tape was used to wrap the entire harness once complete.


Before replacing the harness I took the time to clean and inspect each coil pack.  I removed dirt and carbon from the bit that contacts the spark plug and applied a light coating of dielectric grease to help prevent arcing.


Once the coil packs were back in place the harness was ready for re-installation.


Once the cover and intake tube were back in place a quick test drive was taken to ensure all was in working order.


Saturday, June 15, 2019

Wheely Shiny Wheels

Amy was pretty insistent about wanting the wheels on the Pulsar NX painted silver.  I had already experimented with Plasti Dip and had coated two of the wheels in black.  I did not proceed with coating the other two wheels since I knew that I had to have new tires mounted; an operation which would destroy the Plasti Dip finish around the rims.  In researching possibilities to paint the wheels silver, I read reviews on Plasti Dip Bright Aluminum Metalizer.  Many people were using this to color their wheels with great success.  A quick search on Amazon made me realize that this was a very popular color and the price per can was in the $25 range.  I decided that this was the route I wanted to take and I was able to locate three cans of the Bright Aluminum color at Pep Boys for $8 per can!

The Plasti Dip Metalizer coatings require a base coat of another basic color.  Black Plasti Dip is cheap enough and works perfectly as a Metalizer base coat.  After thoroughly cleaning the wheels, I began by masking the tires then applying three coats of black Plasti Dip to the front and back.


After the black basecoats three coats of the Metalizer were applied.


I must say that the coating exceeded my expectations.  The wheels look as if they were made of cast aluminum.  Amy was quite thrilled to see them on the Pulsar!

First Drive

After finishing up a front-end alignment it was time to insure the Pulsar NX as it was getting close to being road-worthy.  Why not celebrate by letting Amy take her first drive outside of the neighborhood!  She chose to drive about 5 miles to Sonic for a Diet Coke and had a smile on her face the entire time.


Pulsar Polishing

The paint on the Pulsar NX was in really bad shape.  Based on it's condition, sap etchings, and pine needles in every nook and cranny, I'm guessing it had spent many years parked under trees.  When we first purchased the car I gave a quick test on the deck lid to see just how bad the finish was.


After much color sanding, polishing, sanding through to the primer, painting, sanding through again, polishing, and waxing, the finish is finally at an acceptable level.  While not perfect, the Chemical Guys Black Light glaze really gave the paint a deep shine.

Back in Black

Some of the trim on the Pulsar NX had faded over time.  Additionally, some of it had old wax stains that I was unable to remove using a vinyl eraser (of you've never read about using a vinyl eraser to remove wax from trim, Google it; you'll be amazed).  You can see these marks in the photo below, just above the turn signal.


After some research, I found a product that seemed to be highly recommended for restoring black trim: Forever Black.  This is not a dressing but rather a treatment that will dye the plastic black again.


The result was quite impressive!  After two coats the white marks disappeared and the trim was a nice and consistent black color!

Thursday, June 13, 2019

Rack Rebuilding

Previously I had written about my woes with the rack and pinion on the Pulsar NX.  Since the rebuilt steering rack was leaking, I decided to address the leaks in the original rack myself.


The leak was coming from the input shaft at the pinion gear.  Luckily, the seals in this area were the easiest to access.  


After removing the top retaining clip I was able to remove the top cap and replace the top seal.


The rack tensioner was then removed along with the bottom cap and pinion retaining nut.


At this point the pinion was removed by pulling it out from the top.


To replace the lower seal, the lower pinion bearing must also be removed.  I used a blind puller to remove the bearing and subsequently the lower seal.


I then installed a new lower pinion seal and replaced the bearing using an appropriately sized socket to tap them both into place.  The pinion was then slid back into the rack housing and the tensioner was reinstalled.


The top cap and seal was put back into place and the retaining clip reinstalled.  A fresh set of bellows was installed and the rack was reinstalled into the car.


A vacuum bleeder was used to both purge the air from the system and test for leaks.  The reservoir was topped off and the system was tested.  After several test drives no leaks were found.  I now have to decide what to do with the rebuilt rack, but the ultimate goal of repairing the steering system on the car has been achieved.