Sunday, December 4, 2016

Escutche-what?

As I mentioned in a previous post, I found one of the escutcheon covers under the passenger seat.  At that point, I didn't even know such covers existed.  The one that I found didn't stay in place very well, so I decided to fix it.  Once again I called upon my plastic welder and added some bulk to one of the tabs that had been reduced with multiple insert-removal cycles.


Since I was in the area, I removed both escutcheons and polished them with Quick-Glo. 


After some research, I found that the small hole on the rim of the escutcheon is supposed to contain a door handle bumper.  I haven't seen this bumper advertised anywhere, and being such a small part I thought that they must get lost easily anyway.  I decided to make my own by injecting a blob of RTV silicone through the back until a small bit protruded through the hole.


At least I can replace these bumpers easily if they don't last.  I also obtained another cover for the driver side from ZCarDepot.

Now with chrome tip!

Who would have thought that underneath 40 years of road grime, carbon, and miscellaneous goo there would be something beautiful?  The exhaust tip on my 280z looked corroded beyond hope.


Employing sandpaper, a Dremel, a plastic knife, a 3" random orbit polisher, and a product called Quick-Glo, I was able to discover the inner beauty of this item.  I also cleaned the mounting bracket, bolts, and inner surfaces with a flapper sanding wheel on my Dremel, then coated them with exhaust paint to keep them from rusting.


For those that have never used it, Quick-Glo is an awesome product for quickly cleaning and protecting chrome.

Sunday, November 27, 2016

Get a grip!

I replaced a missing hardware cover on the driver side door pull.  Another small thing off the punch list.

No trimmings

New and Improved!  Now with more trim!

Treasure hunting

One of the cool things about acquiring a 40 year old car: 40 years of "stuff" to discover in the nooks and crannies!  I was exploring the under-seat areas as well as the storage compartments and discovered the following unexpected treasures:

  • Extra wheel chocks (other than those in the original toolkit)
  • Two packs of Extra gum, although the flavor did not last an extra long time
  • A spring, likely from a seat mechanism
  • Various screws and washers
  • A broken seat belt adjustment warning placard (I found both parts so I will be able to repair it)
  • The passenger door handle escutcheon cover (Don't worry, I had to look it up too: a flat piece of metal for protection and often ornamentation, around a keyhole, door handle, or light switch.)
  • An extra lug nut that doesn't fit this car
  • One of the outer shift boot clips
  • A mystery receipt from Pep Boys in Las Vegas (what was bought in Vegas may have stayed in Vegas).
  • 47 cents!  Woo-hoo!
  • An extra oil filler cap that looks brand new
  • A US Postal Service collectors reference from 1981
  • A couple of floor mats
  • A cap to something (still working on where it came from, but it looks to be from the car)
  • A Cross pen with the initials NLD engraved on the side.  It still writes!
  • What looks to be the wiper shaft seals

Friday, November 25, 2016

Rebranding

I returned the rear badges to the hatch after restoring them.  The repaired mounting stud held up well and the 280Z badge no longer rotates!

Bumped!

Another little project done today: new hood adjustment bumpers.  The bumpers installed on the car were interesting; they looked to be plastic caps filled with silicone around the original bumper bolts.


I ordered new bumpers from Black Dragon Auto (closing their doors at the end of the year) for a couple bucks.  After opening the bag, I found that the construction of the units was less than optimal; you get what you pay for.  The rubber bumper was good, the problem was the pan-head bolt and washer used for the adjustment; the rubber bumper would barely stay in place.

I decided to use the new rubber in combination with the old adjustment bolt.  I began by removing the cap and silicone from the bolts.


I then shot the bolts with a coat of paint, mainly to keep them from rusting.


Once dry, I inserted the bolt into the rubber bumpers and returned to the car.  


And that's how you write an entire blog post about something as trivial as hood adjustment bumpers.

Let there be light

I finally reinstalled the engine compartment trouble light after cleaning it up and printing a new lens.  Yes, I even polished the mounting screws.

Dash good!

With my clock project and center dash work complete, I was ready to reassemble the dash.  Upon beginning to insert the glove box, I found that the passenger vent duct had a hole in it.  After patching the hole in the duct, I found another.  Instead of patching that, I thought I'd better just replace the entire duct.  No one carries 2" duct anymore; I guess manufacturers use hard plastic duct nowadays.  I bought the last box of Dorman 2" defroster duct on Amazon.com.  Unfortunately the decline of the brick-and-mortar means waiting for parts before proceeding; luckily I am a patient man...  just don't ask Amy...

I noticed I was missing a couple of screws (no comments) while reassembling the glove box.  For those that critique my odd behavior of taking apart broken things and keeping the hardware: who's laughing now?  I found replacement screws that exactly matched original hardware in my recycle bin!  In fact, I found a bag of new replacement screws for rusty counterparts during my grill installation as well.  For the existing center dash hardware, I used my Dremel to remove the paint from the existing screws and shoot a fresh coat on the heads before cranking them down.


Taking out the tr-ash

Sometimes it's the little things that make me smile.  Like a clean ash tray...


Before: Lots of gunk and surface corrosion


After: Nice and shiny!

Wednesday, November 23, 2016

It's time for grille-in!

A few weeks ago I pulled the grille on the 280z in order to address some damage.  While I don't know what happened, at some point before I bought the car something hit the the driver's side and mangled the grille as well as breaking the turn signal trim.  You can see that the grille took a beating in the below photos.  You can also see the condition of the paint on the grille: flaking off the aluminum and rust on the steel.


After pulling the upper and lower grilles, I stripped the old paint with a sandblaster and good old fashioned sandpaper.  I then disassembled the upper grille in order to straighten the bent blades.  This was not as easy as I expected due to the rolled edge on each blade, but I kept at it.


Once the blades were straight, I reassembled the upper grille and hit the grilles with several coats of primer.


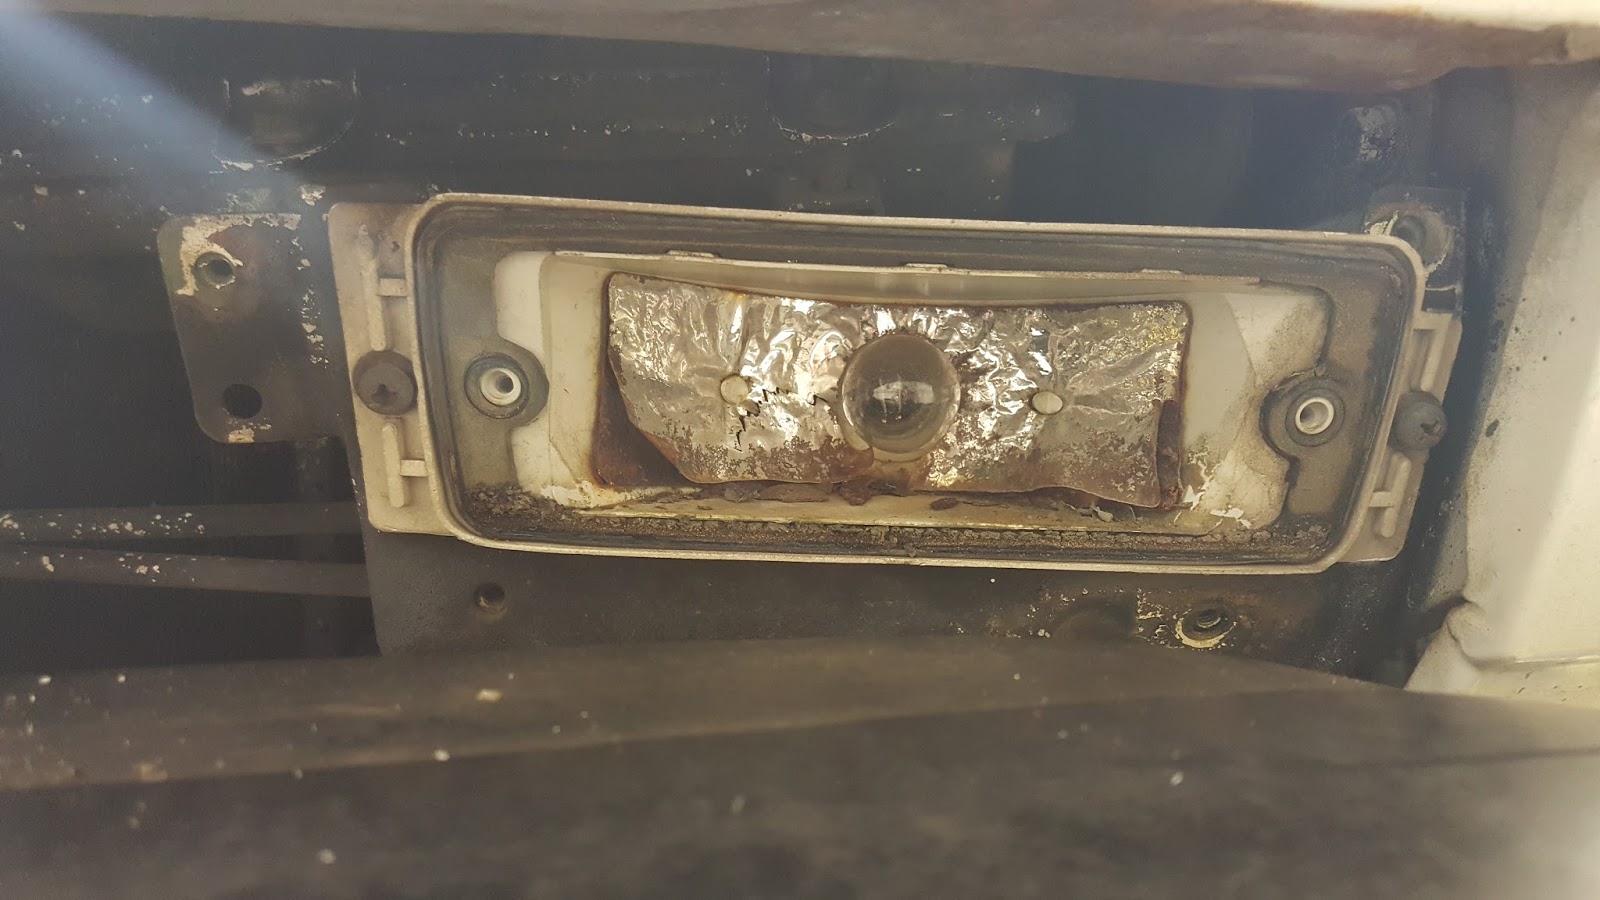
I then turned my attention to the turn signals.  I knew there would be some work here as the drivers side turn signal (the damaged side) was slightly twisted.  Both signals were a bit dim as well.  Upon removing the lenses, I found the reason why the signals were so dim: the reflector inside the housing had completely rusted, leaving the foil coating barely clinging to the bits of rust.  


After removing the reflector with a Dremel cutting wheel, I used a sheet of aluminum foil folded over many times to create a new reflector.


I had ordered some new lenses and lens gaskets in anticipation of changing them out.  I didn't realize just how much the original lenses degraded over 40 years.  You can't see it in the picture, but the original lens had many "spider" cracks in the plastic.


Now that the turn signals had been addressed, it was time to straighten out the driver's side turn signal mount.  Donning long levers, large pairs of channel locks, and pliers I wrestled the mount into submission and rough alignment with the opposite side.

Once the mount was straight it was time to return my freshly painted grille to its home.  I was excited to see how the car would look with a clean and straight grille.  I wasn't disappointed, either.  I used semi-gloss black which gives the area a nice look.  The turn signals were nice and bright as well!