Thursday, June 22, 2017

Split the diff-erence

Tonight I began disassembly of the differential on the 280z.  I began by draining the fluid.  Usually you don't remove the drain plug without first removing the fill plug, but the fill plug here is seized.  If you look closely you can see that I've rounded the plug in my attempts to remove it (even an impact wrench failed).


With the drain plug removed, I drained what I imagine was 40 year old differential fluid.


The magnet on the drain plug didn't have a lot of shavings on it... a good sign.


The process to remove the output shaft is simple, but it sure didn't feel right: stick a crow-bar between the flange and housing and give it a whack. 


It was effective though, and the shafts popped out.


Removing the cover was a bit more challenging.  The gasket acted as a cement holding the cover in place.  After a few whacks with a rubber mallet (good whacks), I used a screwdriver to pry the cover off.  There is a hole in the upper left side of the housing that made this easy.


I have a plan of attack to remove the stuck fill plug.  The first step is to soak the back side of the plug with PB Blaster for a few days...


Stay tuned for more!


Sunday, June 18, 2017

Dropping the diff

Removing the differential from the 280z wasn't difficult, but it did require some steps I didn't anticipate as it's surrounded by many supports and components.  I'll highlight the method I used, which may turn out to have had some superfluous steps.  

I started by removing the exhaust.  This began with removing the exhaust shield from the catalytic converted (mine is a California model) and the rest of the exhaust.  There were a few stuck bolts to contend with here but nothing too bad.


Once the shields were off I removed the rear pipe and muffler.  One thing I noticed while removing this was that only one muffler mounting strap was holding the muffler in place, and that strap was seriously degraded.  The other had let go many years ago.


The pipe flange bolts released without too much difficulty after a shot of PB Blaster and coaxing with a breaker bar.  The catalytic converter came off in the same way.  I did notice that the cat wasn't blocked at all and still looks good; I wonder if it had been replaced at one point.

After the exhaust was out of the way I was able to remove the driveshaft shield by removing the mounting bolts, noting which positions had the extra support braces in place.

The NVH block (Noise, Vibration, & Harshness) was next to go.


While it was in my face and accessible I took the opportunity to adjust some slack out of the emergency brake assembly.  This was as simple as backing off a lock nut and turning the adjuster.


You can see in this pic that one of my output shaft seals is leaking.  From what I can tell the replacement of these seals is simple.  The pinion shaft seal is not quite so simple, though.  Since mine isn't leaking I might just leave it.


Next I removed the rear sway bar.  This was as simple as removing the bolts on the frame mounts as well as the control arms then working the bar out of the area.


You can see the rubber on the drop links aren't in the greatest of shape; these will be replaced with poly counterparts later.


The half-shafts were next to go.  I removed the bolts at the diff and stub-axle, then worked them out of the area.  The universal joints feel solid on these so I don't think any replacements will be necessary; I'll clean them and shoot some grease into the fittings.


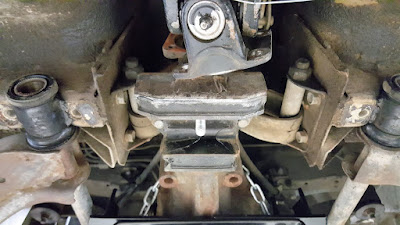
The prop shaft was next to be disconnected from the diff.  I didn't remove the entire shaft as I just changed the transmission oil, so I improvised a hanger to hold the shaft out of the way while removing the diff.  Ironically enough, the universal joints on the drive shaft are loose and since they are staked, I'll have to replace the entire shaft.  I guess I'll be buying another gallon of MT90 after all.  At this point I also removed the front cross member as well.  I was worried that the control arms would drop or shift when I did this, but they stayed in place, even with the weight still on the rear wheels.  Note that at this point I also had a transmission jack underneath the diff since I was removing the front cross member which bore weight.


At this point the rear mustache bar diff mounts were removed.  These are studs and on one side the nut released while on the other side the stud released.  It would have been easier if both studs had released, but whatever...


I then carefully worked the diff out of the area while lowering it on the jack very slowly.  After some maneuvering, I had it clear.


Finally, I wanted to remove the mustache bar.  The only way to get that out would be to remove the rear cross member.  I reinstalled the front cross member (just to be cautious and ensure the control arms didn't move), then removed the rear cross member, along with the drop mounts from the body.  At that point I could then remove the mustache bar.


The mustache bar bushings will be replaced with poly soon which is the reason for the latter work in removal.  Now it's time to work that stuck fill plug out of the differential cover...

Saturday, June 17, 2017

Starting to make a diff-erence

Today I dropped the differential out of the 280z.  I did this for a few reasons:

  • The fill plug is seized and I can't really get a good shot at removing it with it in the car (it is blocked by a crossmember).
  • I have a polyurethane bushing kit just waiting to be installed.  Several bushings can be easily replaced with the diff out of the car.
  • I have a new diff mount to install.
Some things I have found while removing the differential:
  • A small "clunk" noise that was believed to be caused by a bad differential mount might actually be bad universal joints in the prop shaft.  Unfortunately, the u-joints in the prop shaft are staked and not replaceable.  This means a new shaft, but the new one will have replaceable joints.
  • One of the seals on the diff looks to need replacement.
  • Some of the bushings look to be in good shape, but some aren't.
  • The differential belt will need to be replaced.
Future posts will detail the work identified above.


A journey of a thousand miles

Ok, so it was really only 200 miles.  The 280z participated in its first Honk, Rattle and Roll tour last weekend.  The car ran well and didn't give any problems during the tour.  It was a really hot day, though, and a couple of minor issues surfaced that will need some kind of attention:

  1. The repaired dash crack couldn't stand up to direct sunlight.  A thin crack developed along the edge of the repair when things heated up.
  2. The HVAC fan began whining when running at full speed and things were at their hottest.  I'm guessing that the bearing in the motor is going.
On the plus side, the repaired blinkers worked flawlessly all day!  It was a fun trip and a chance to spend the day with my father to boot!


Saturday, June 3, 2017

Addressing my crack problem

I broke out the plastic welder with the intent of making the crack in my dashboard look just a little better.


After lots of filling and sculpting using the lowest heat setting, I had something that, while not perfect, looked much better.

Blinkers on the blink again

While driving the Z today my left blinker began acting erratically and ultimately stopped working.  If you've kept up with my rambling on this blog you'll know that I've been battling issues with these blinkers since I brought the car home.

I once again pulled the stalks off the steering column.  This time, my intent was to disassemble the turn signal switch itself.  My inspiration for this came from the following post:  https://fiddlingwithzcars.wordpress.com/2012/12/04/turn-signal-repair/


After removing the switches from the assembly, I pried the tabs back on the turn signal switch and removed the components.  I found that the electrical contacts were completely covered with some type of black gunk.


I wiped off the loose gunk from the board then used a wire brush on a Dremel to clean the contacts to a nice shine.


I then reassembled the switch, which was a bit tricky since the little steel ball had to be balanced on a spring before mating the housing with the board and contacts.  I ended up putting a dab of dielectric grease on the spring to keep the ball in place during assembly.  It still took a few tries, but I finally got things back together.  I found that the position of the tabs made it critical to bend them "just right" to ensure the board was centered properly.  After returning the stalks to the steering column I gave the turn signals a garage test which was successful.  Next weekend will put the repaired switch through a day of real-world testing.


That grinding noise can't be good

My son is an assistant instructor in a Tae Kwon Do class for special needs children and he teaches every Saturday morning.  Since my wife had another event this morning I had to drive him.  Why not drive the Z?  After loading his gear we take off for his class, running just a bit behind.  I turned into the parking lot and hit the first speed bump; immediately afterwards a grinding noise began from the rear of the car.  I pulled into the closest parking spot I could find.  My first thoughts were something rubbing the wheel or maybe one of the half shafts or propeller shaft rubbing against something.  My second thought was that I needed to be at another event in a few hours and if I needed to be towed I was going to be late.

After getting my son into the classroom, I slowly moved the car into a shaded area and tried to pinpoint the location of the noise.  It sounded like the passenger rear wheel.  After parking the car I jacked up the car and removed the wheel.  Spinning the brake drum confirmed that this wheel had a problem.  I was able to pull the brake drum off and then the problem became obvious... the lower spring on the brake shoes had broken and was dragging inside the brake drum.  Of all the things that could have caused a grinding noise, this was definitely one of the better options as I could make it home without this spring.


I removed the broken spring and returned the drum and wheel to the car.  I was amazed at all the looks I received as I worked on my car in the parking lot, one nice person even asked if I needed a ride to the auto parts store.  After class was over we returned home.  I had a new spring on hand from my box of awesomeness and was able to quickly get things back in proper order.  Once finished I quickly got cleaned up, jumped in the Z again, and headed to my afternoon event arriving just on time.

Friday, June 2, 2017

Giving my throttle the boot

The throttle linkage boot had disintegrated on the 280z, so I decided to not only replace the boot but also clean up and regrease the entire throttle linkage assembly.  The first step was to remove the linkage.  This was accomplished by simply (and carefully) prying upwards on the ends.  I was concerned about cracking the plastic, but the ends were pretty tough.


Although I had read that this linkage needed to be removed from under the dash, I was able to remove the linkage attached to the throttle pedal from the firewall side.  I removed both linkages and the pivot assembly.  This included two plastic bushings.


After soaking the parts in a mixture of Simple Green and cleaning them with a wire brush, I greased all pivoting parts with a plastic-safe white lithium grease. To install the boot, I had to remove the ball socket; only one end is removable on each linkage.  In this case the removable end was the end directly connected to the throttle pedal assembly.


I put the new boot into place, returned the ball socket (ensuring the linkage was the same length) and snapped the throttle linkage back onto the throttle pedal assembly (again from the firewall side).


I then worked the groove in the throttle boot into place on the firewall and returned the remaining linkages into place.  After testing the linkage a few times without the engine running I took the car for a test drive to validate that everything was in working order.

The upholstery has kissed my rear end

I finished installing the seat foam and covers on the driver's seat.  For the most part, the driver's seat was similar to the passenger seat.  One difference was related to the backrest; one of the tabs to hold the cover in place was missing, so the previous installer had simply riveted the seat cover to the seat back.  After drilling the rivets I cut a small piece of steel into shape and simply screwed it into place using one of the rivet holes.


After reinstalling the seat I took the car for a drive...  what a difference new foam makes!  I no longer feel like I'm sitting on the floorboards and the seat is very supportive.  I am very pleased with the results of this work!