Saturday, September 30, 2017

Back in Control

As I have written in my previous posts, I have been replacing the aged rubber bushings on the 280z with those in the Energy Suspension master bushing kit.  I've moved this work to the front of the car and tackled everything attached to the front control arms.  As you can see, the bushings on the radius strut were ready to be replaced.


To begin, I removed the front sway bar, linkages, and mounts, and the radius (compression) struts from both sides.  I then jacked up one side of the car and removed the control arm from that side by unbolting it from the steering knuckle and removing the inner bushing pivot bolt.  While I did not have to remove the rack and pinion, I did remove the mounting straps so that I could push the steering linkage upward to remove the pivot bolts.  


The next trick is getting the old bushing out of the control arm.  Again donning my propane torch, I heated the rubber bushing to the point where the rubber ignited and allowed the inner sleeve to be removed.  After removing the rest of the rubber, I was left with the control arm and the outer bushing sleeve still solidly in place.


After reading a great write-up on installing the Energy Suspension kit, I started cutting the inner bushing with a hacksaw.  This was moving too slowly for me, so I sped up the process by using a bi-metal blade in my sawzall.  I stopped when the cut was close to the control arm and finished the cut with a hacksaw.  Once through, I used a screwdriver to "curl" the inner sleeve and release the tension holding it in place.


Despite how careful I tried to be, I still managed to score the control arm.


To fix this, I used a bit of JB Weld (have I mentioned that it can fix anything), then sanded the control arm bushing surface smooth.


At this point I used a wire wheel to prep all metal parts that had been removed.  The lift became a drying rack after I sprayed the parts down with a few coats of Rustoleum Professional satin black enamel paint.


Using a large C-Clamp, I pressed in the new control arm bushings after coating all surfaces with the super-grease supplied in the bushing kit.


I cleaned up all mounting areas on the chassis, then used the Energy Suspension supplied grease on those areas as well (control arm bushing and radius strut bushing).  I then returned the control arm to its proper location followed by the radius strut.


After completing the opposite side of the car in the same manner as above, I turned my focus to the reassembly of the sway bar.


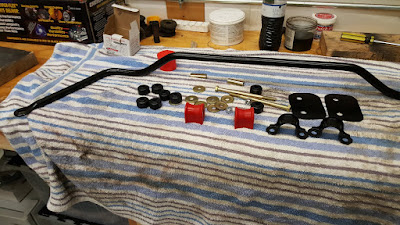
Note in the picture above that the sway bar pivot bushings look different; these bushings are not included in the Energy Suspension master bushing kit for the 280z since several different sizes of front sway bars were used.  I measured the OD of my sway bar and ordered the appropriate Prothane bushings from Amazon.com.  The red bushings were a few dollars cheaper than the black, so I went with red.

I reinstalled the freshly painted sway bar pivots with the greased-up Prothane bushings installed over the sway bar.  This held the sway bar up while I installed the linkages.  Using the same method I employed when installing the rear sway bar linkage, I used a large C-Clamp to compress each linkage so that I could start the nut on the threads. 


Finally, I secured the steering rack using the freshly painted straps.  I chose not to replace the rack bushings as the rubber units already in place showed no signs of deterioration and were still in good shape.


After reassembly I made a quick check of the toe-in (the only adjustable component of alignment on an s30)  to ensure that it had not changed; it was spot-on at 0 degrees.  I then took the car for a test drive to ensure that all felt right, which it did.


Rubber 280z Buggy Bumpers

In the evolution of the s30, the bumpers were updated on the 1974.5 260z to meet the new 5mph crash standards.  This included much sturdier bumpers mounted on shocks to absorb the energy of these low speed impacts.  In order to allow the bumpers to move on their shocks, Datsun added rubber filler panels and ends to the front and rear bumpers.  This first bumper design lasted 1.5 years, afterwards changing in the 1977 and 1978 model years.  

After 40 years, rubber tends to lose it's elasticity and become brittle.  Such was the case with the bumper ends on my 280z.  for the front, one of the bumper ends was in decent shape, albeit brittle, and just missing a "chunk" from the front.  The other side was missing the rear mount portion and beyond repair.


Front bumper ends are still available as new old stock at a price (unlike rears), so I decided to bite the bullet and order one while I repair the other.  

To begin the repair, I used Bondo self-adhesive aluminum patch backing to create a substrate for repair.


Using a product called U-Pol 706 (a product used for flexible bumper repair), I slathered a layer over the repair area.


I then sanded the repair area flush with the surrounding area and feathered the edges.  I used a Dremel to create the contour line in the repair area.


As you can see, I have the shape restored, but now how to restore the color?  Simply painting would not be the right choice, nor would it restore the factory look.  I've been wanting an excuse to try out PlastiDip rubber coatings and this was the perfect project.  I shot three coats over the repaired part to give it a consistent color and restore the black rubber look.  Since I had read that PlastiDip can fade in the sun, I used their Glossifier product to add some UV protection.


In order to make the other parts match, I would have to apply the same PlastiDip treatment to all.  I used the same process as above on all the rubber bumper parts to restore them to like-new condition.


The front turned out better than the rear, but at the end of the day the car looks much better without cracked or missing bumper parts.


Pedal Pad Perfection

Today I replaced the brittle and cracking pedal pads on the 280z.  I obtained replacements for about a buck apiece from Black Dragon Auto just before they closed their doors in 2016.  


Old, brittle and worn pads
New, soft and grippy pads


Sunday, September 17, 2017

I'm Flushed

Not knowing the status of the antifreeze in the 280z, I decided to flush the cooling system.  The first step?  Drain the radiator!  I used a rag to keep the coolant from spraying everywhere when pulling the plug.


I then used a 5 gallon bucket placed atop my transmission jack to capture the coolant draining from the radiator.


After draining the radiator, it was time for the engine block.  The block plug is located on the passenger side of the engine towards the rear.  I used nifty trick to keep the rush of water from going all over the garage floor: make a super-fun happy slide to direct the water into the bucket (bonus points if you get the reference).  In this case I used a foam sleeping pad from our camping gear.


After the coolant had been drained I filled the system with distilled water and a bottle of Prestone Super Coolant Flush I had sitting on my shelf.  I then sealed the system and ran the car in the garage for 15 minutes.  After the engine cooled, I drained the system again using the above procedure.  I then filled the system with distilled water only to get the flush out of the block.  Again, I ran the car for 15 minutes.  

While the car was cooling from this last run, I pulled the coolant reservoir from the car.  While cleaning out the reservoir, I noticed that there was a lot of paint overspray on the bottle that looked less than pleasing.


I used some denatured alcohol and a whole lot of elbow grease to remove the paint.


I finally filled the system with 50/50 coolant and ran the car for another 15 minutes.  An inspection of the drain bucket revealed more rust and scale from the system than I would have liked to see; I may do this again in a few months and see if more comes out.

Saturday, September 9, 2017

Mounting up the motor

In my last post I replaced the transmission mount and crossbrace bushings.  Next on my list of aging rubber to replace was the motor mounts.


When researching how to replace the mounts, the shop manual describes supporting the engine from above.  While I do have a shop crane, I didn't want to remove the hood to use it (the hood on a 280z opens towards the front of the car).  Others suggested that the engine could be slightly raised by placing a thick piece of wood under the oil pan and use a floor jack.  I felt that replacing the mounts from the underside of the car would be easier, so I decided to use a transmission jack under the oil pan with a 2x8 cut to the width of the oil pan to lift it.

After inspecting all of the items fastened to both the engine and the chassis, the air intake boot was the only bit that I felt it necessary to disconnect in order to lift the engine a couple of inches.

I began by removing the driver-side engine mount bolts and positioning the transmission jack underneath the oil pan.  I then loosened the passenger side engine mount and the transmission mount.  I slowly raised the jack until the engine mount began to lift.  


Several times I climbed onto a ladder to check for stressed engine components but found none.  The removal of the old mounts was not difficult once I got the courage to raise the engine high enough.  Installing the new mounts, however, did come with a few challenges.  The new mounts differed from the original mounts in two ways:

  1. The new mounts did not include weld nuts under the mounting holes.  In order to install these I would have to supply my own bolts and nuts.
  2. The new mounts did not accommodate the bracket that must have been added in later engines that protects the engine from moving forward or backward when the mounts break.
To accommodate the protective bracket, I simply had to cut a bit of rubber from the top side of each mount.


Once the new mount was in position, I lowered the engine until it was close to resting on the new mount.  I did this to ensure that I had some ability to move the mount in order to put the new bolts into place.  As it turns out, securing the new mounting bolts, washers, and nuts was the most difficult part of the job.  With the movement protection bracket in place, I needed fingers the size of a small child to hold the washers and nut in place.


Eventually I was able to start the nut on the threads.  Once all nuts were started I lowered the engine completely and torqued the nuts to spec.


When inspecting the old mounts, it was apparent that they were ready for replacement.  The rubber had cracked and begun to separate from the metal base.


With these and the transmission mount now replaced, I will be curious to see if the clunk when shifting still exists on the next drive.

Tuesday, September 5, 2017

My Tranny is Bushed

I've been making the rounds of replacing 40 year old rubber on the 280z; today it was the transmission mounts and bushings on the transmission crossmember.


After positioning a transmission jack under the rear of the transmission, I removed the crossmember and the transmission mount.


To replace the bushings in the crossmember, they first needed to be removed.  The fastest way to remove the old bushings was to use a propane torch and burn them out.  It also gave me a chance to use a torch and play with fire!


Once the bushings had "dripped" out of the shell and subsequently cooled, it was time to remove the old paint.


A couple of coats of fresh paint and it was time to move on to the transmission mount.


The transmission mount had obviously never been replaced.  The rubber was cracked and very compressed.  It was obvious that it needed to be replaced when viewed side-by-side with a new mount.


With the new transmission mount in place, it was time to install the new Energy Suspension poly bushings into the transmission crossmember.  After greasing the shell and the bushings, I used a C-Clamp to press them into position along with the inner shell.


With the bushings in place, it was time to bring it all back together.  Since the bushings were new, I had to use a bit of grease on the outer surface along with a large screwdriver to "shoehorn" the crossmember back into place.  Another job done!  My next drive will tell me if this has cured the clunk...


Monday, September 4, 2017

Taking Zecondz and Thirdz

I have been attending the Wilson County Fair Antique Auto Show each year for the past several years.  Typically I meet my father there on the designated Sunday each year to view the large turnout, usually numbering around 250-300 cars.  In all those years, I saw many familiar cars that were entered each year and sometimes a few I didn't recognize.  I never, however, saw any Datsuns and very few foreign cars in the show.  This year, I decided to change that by entering my 280z.

On the morning of August 20th I waited in the line to be entered and judged.  The heat had already started to climb and I was a bit worried that some of the cars might not tolerate this stagnation without overheating.  I did hear a few cars stop and start while waiting; maybe that was how they dealt with the situation.


I completed my entry form and selected class 11: production cars years 1970-1992.


As I was guided to my parking spot, I was stopped so the guide could take a picture of my car, stating that they never saw any Datsuns at the show.  "Mission accomplished," I thought.  I was placed mid-field next to a nice gentleman in a mid-90's Jaguar and a 60's Chevy Impala whose owner I didn't get to meet.

I opened the hood and hatch, placing information about Honk, Rattle and Roll car club in the cargo area along with a poster outlining the history of the S30.  As an added bonus, Randy Shemin also attended with his newly acquired 1995 300ZX Twin Turbo; we had not just one but two fine examples of the Datsun/Nissan Z in the show! I spent some time sitting behind the car, viewing the other cars, and walking around the fair.  When I was with the car, I heard several comments such as "I used to have one of these," or "I always liked the looks of these."

At 4pm the trophies were announced.  While my father believes wholeheartedly that I entered the show to win a trophy (not the case as I stated above), I couldn't help but feel just a bit of excitement as the winners for each class were announced.  In the production car class, several of the classes were empty, likely due to the narrow range of years in the pre-70's classes.  When class 11 was called, the MC noted that this was one of the biggest classes with many cars.  I was surprised when my name was called for the third place ribbon!  My wife and son were with me at that point and she snapped this picture just afterwards.


Shortly after, the winners of class 27, stock and modified 93-03, were announced.  Randy's 300ZX took second place in his class!  It was a great "first" showing for the Z's this year!