To begin, I removed the front sway bar, linkages, and mounts, and the radius (compression) struts from both sides. I then jacked up one side of the car and removed the control arm from that side by unbolting it from the steering knuckle and removing the inner bushing pivot bolt. While I did not have to remove the rack and pinion, I did remove the mounting straps so that I could push the steering linkage upward to remove the pivot bolts.
The next trick is getting the old bushing out of the control arm. Again donning my propane torch, I heated the rubber bushing to the point where the rubber ignited and allowed the inner sleeve to be removed. After removing the rest of the rubber, I was left with the control arm and the outer bushing sleeve still solidly in place.
After reading a great write-up on installing the Energy Suspension kit, I started cutting the inner bushing with a hacksaw. This was moving too slowly for me, so I sped up the process by using a bi-metal blade in my sawzall. I stopped when the cut was close to the control arm and finished the cut with a hacksaw. Once through, I used a screwdriver to "curl" the inner sleeve and release the tension holding it in place.
Despite how careful I tried to be, I still managed to score the control arm.
To fix this, I used a bit of JB Weld (have I mentioned that it can fix anything), then sanded the control arm bushing surface smooth.
At this point I used a wire wheel to prep all metal parts that had been removed. The lift became a drying rack after I sprayed the parts down with a few coats of Rustoleum Professional satin black enamel paint.
Using a large C-Clamp, I pressed in the new control arm bushings after coating all surfaces with the super-grease supplied in the bushing kit.
I cleaned up all mounting areas on the chassis, then used the Energy Suspension supplied grease on those areas as well (control arm bushing and radius strut bushing). I then returned the control arm to its proper location followed by the radius strut.
After completing the opposite side of the car in the same manner as above, I turned my focus to the reassembly of the sway bar.
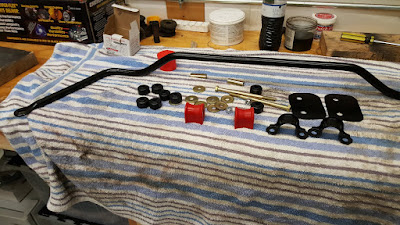
Note in the picture above that the sway bar pivot bushings look different; these bushings are not included in the Energy Suspension master bushing kit for the 280z since several different sizes of front sway bars were used. I measured the OD of my sway bar and ordered the appropriate Prothane bushings from Amazon.com. The red bushings were a few dollars cheaper than the black, so I went with red.
I reinstalled the freshly painted sway bar pivots with the greased-up Prothane bushings installed over the sway bar. This held the sway bar up while I installed the linkages. Using the same method I employed when installing the rear sway bar linkage, I used a large C-Clamp to compress each linkage so that I could start the nut on the threads.
Finally, I secured the steering rack using the freshly painted straps. I chose not to replace the rack bushings as the rubber units already in place showed no signs of deterioration and were still in good shape.
After reassembly I made a quick check of the toe-in (the only adjustable component of alignment on an s30) to ensure that it had not changed; it was spot-on at 0 degrees. I then took the car for a test drive to ensure that all felt right, which it did.


